
Blogger is one of the most popular blogging platforms for both personal and professional blogging, and Cloudflare is a trusted and very popular Content Delivery Network (CDN) that possibly every webmaster has heard of.
In this article, I will show you how to set up Cloudflare CDN for your Blogger Blog for free and will also discuss some of the cool features that Cloudflare provides.

Along with the tutorial on how to set up free Cloudflare CDN for Blogger, I will also provide the solution to a common problem that occurs due to the wrong configuration of Blogger with CloudFlare, causing SSL handshake failures and makes your website non-accessible.
Cloudflare not only helps in increasing a website’s speed, but it also protects against various attacks, for example, a DDOS attack, in which, the victim’s website is attacked from many sources at the same time by sending a flood of traffic, making it impossible to stop the attack and thus causing the website to crash.
I have been using Cloudflare for a long time on all of my websites and strongly recommend everyone to use it for their website/blog as it drastically improves the website’s performance and security to a large extent and also adds a ton of plugins and options to enhance the user’s experience on the website.
As represented in the diagram below, Cloudflare prevents such attacks by routing the traffic to your website through a series of intelligent networks which can detect unusual behaviour from traffic and block the attackers from accessing your site. But it doesn’t cause any disturbance to the search engine crawlers and genuine visitors.

Cloudflare also provides a free SSL certificate for your blog that allows visitors to access your site over HTTPS and also gives a boost to your search engine ranking, as HTTPS is an important ranking factor for Google.
That was the security part in brief.
Now coming to the second most well-known perk of using Cloudflare, the different ways in which it speeds up your site.
- Cloudflare uses its global CDN network to deliver your web pages to your visitor faster.
- Some domain registrars charge a premium fee for fast DNS. But once you connect your site to Cloudflare, it will resolve your domain name using its own super-fast DNS servers, for free!
- By caching the static resources of your website, Cloudflare improves the page load speed and reduces the pressure on your server.
- By automatically minifying the HTML, JavaScript and CSS in your source code, Cloudflare reduces the size of your pages and thus decreasing the page load time.
Well, those were some of the basic reasons why you should definitely use Cloudflare CDN for your Blogger Blog.
Now I’ll show you the step by step process that you need to follow in order to set up free Cloudflare CDN for Blogger.
Also Check Out: How To Setup Free Push Notifications For Your Blogger Blog (And Get Tons Of Returning Visitors)
Table of Contents
HOW TO SETUP FREE CLOUDFLARE CDN FOR BLOGGER BLOG (STEP BY STEP PROCESS)
Requirements: Please note that you would need a custom domain in order to set up Cloudflare for your Blogger blog, as it does not support subdomains (subdomain.blogspot.com). You can get some custom domains (like .ml, .tk, etc.) for free. Although, I won’t recommend using free custom domains as those are usually considered to be spammy. (Note – .blogspot.com domains are excellent for SEO, they do not have any downside in terms of SEO ranking factors.)
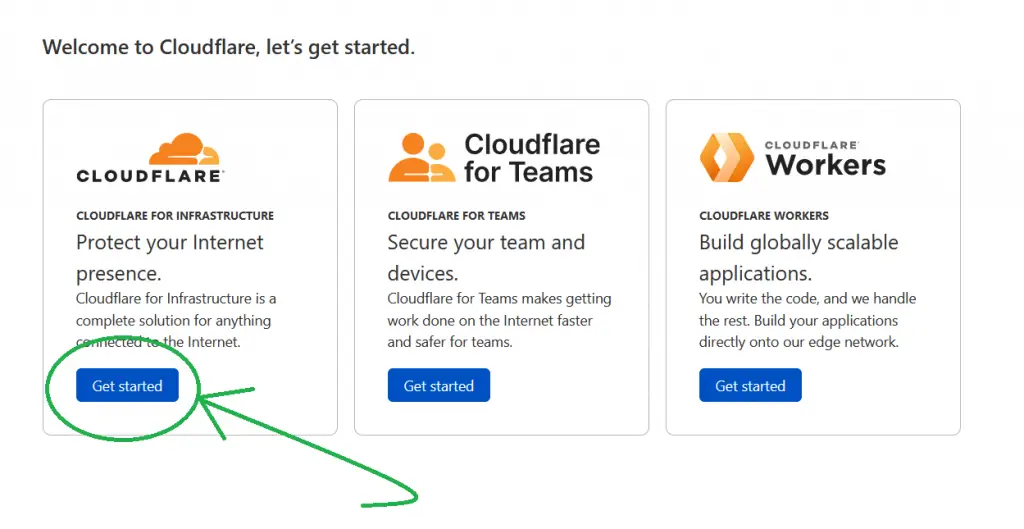
1. Sign Up On Cloudflare
Go to www.cloudflare.com and signup with your e-mail address.
Then click on the Get started Button under Cloudflare for infrastructure.
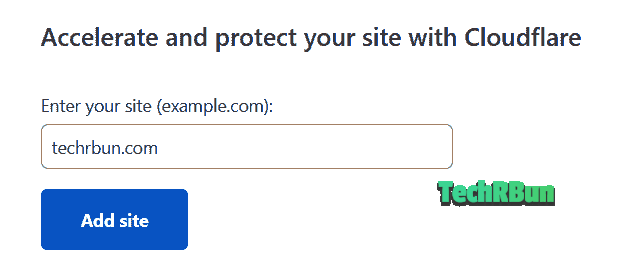
2. Add Your Website’s Address
Type in your website’s address in the given field as shown below and click on the ‘Add site’ button.
3. Choose Your Plan And Security Level

You will be asked to choose a plan for your Cloudflare account. The free plan provides all the necessary features that you would ever need.
4. Verify DNS Records
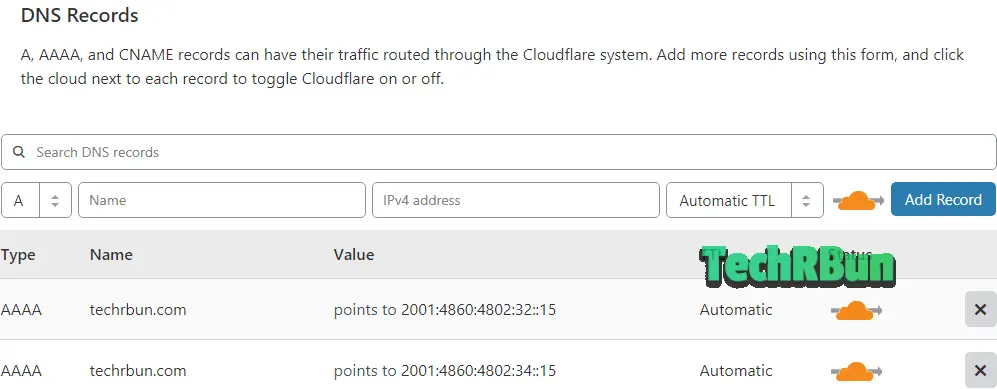
Cloudflare will take a few seconds to scan your existing domain records.
After that, a list will appear from where you can verify that all your DNS records have been detected by the system and if something is missed out, then you can manually add them.
If there’s any subdomain that you want to keep off the Cloudflare network, you can remove it on this step.
An orange cloud represents that the sub-domain will be cached and served over the Cloudflare network, while a grey cloud represents that the particular sub-domain will bypass the Cloudflare network and all requests will directly go to your webserver.
No worries if you are not sure what these mean, usually Cloudflare automatically detects everything correctly and you can simply move on to the next step.
If you have custom mail servers, you can add them here too. (You can find the instructions on how to add e-mail records on Cloudflare from here.)
5. Change Your Nameservers To Cloudflare Nameservers
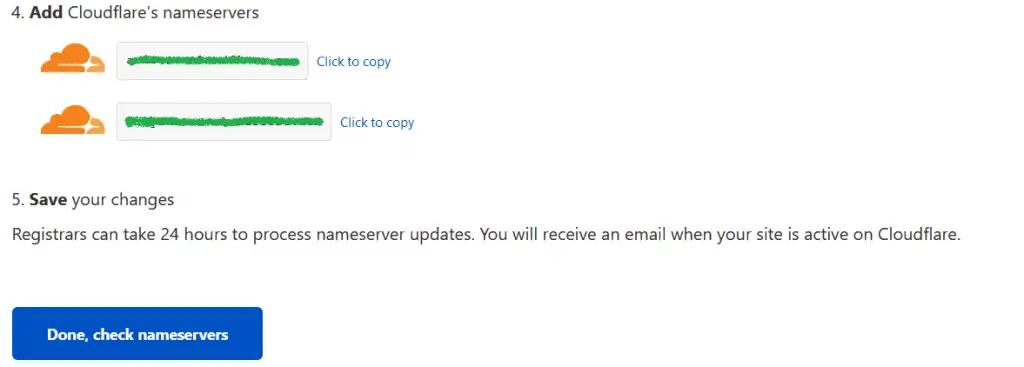
This is the last step and here you will be provided with two nameservers from Cloudflare.
You need to replace your existing nameservers from your domain registrar’s DNS settings with these two nameservers provided by Cloudflare.
To change the nameservers, first, log in to your domain registrar’s website and click on the manage DNS option. There you will find some existing nameservers. Delete all of them and add the two nameservers provided by Cloudflare.
Here’s an example screenshot on how to configure it on Google Domains:

If you are not sure how to change the nameserver, do a web search for the following search term – “how to change nameservers on (your domain registrar’s name)”
After you have replaced the nameservers, be patient as it might take a few hours for the changes to be updated. You will receive an e-mail from Cloudflare when your site is successfully added to Cloudflare.
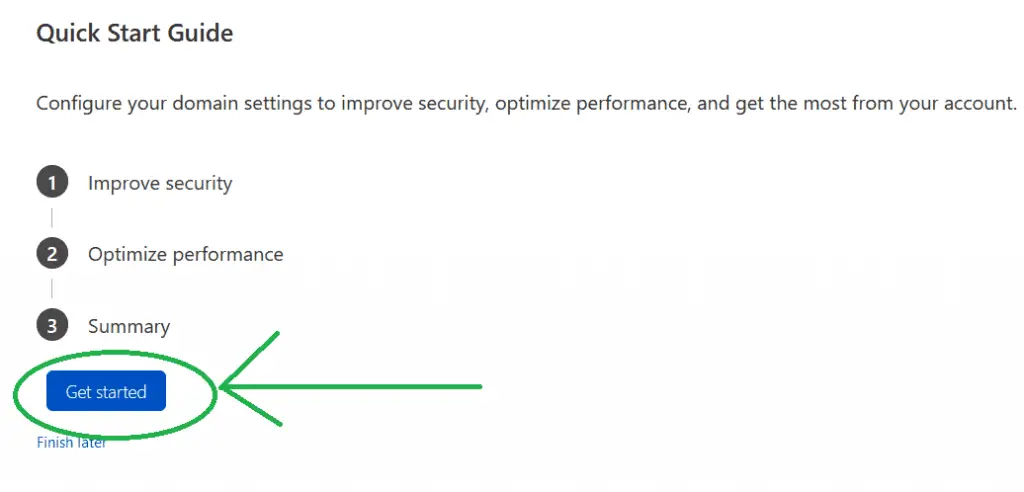
Complete The Quick Start Setup
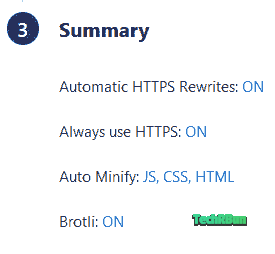
Keep Automatic HTTPS Rewrites Turned On
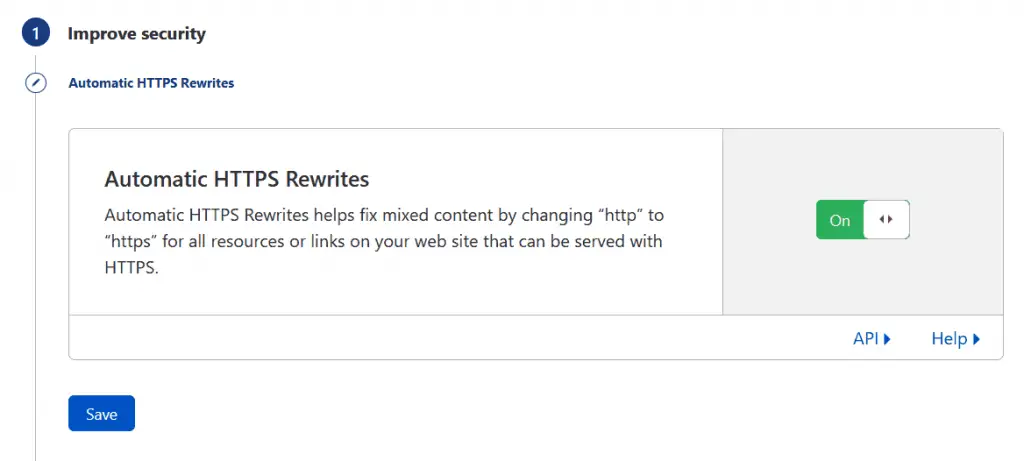
We often use external scripts which may contain insecure links that may affect the security of the visitor. Sometimes we even forget to add the “https” while linking to external resources from our articles or pages.
With Automatic HTTPS Rewrites turned on, Cloudflare will fix all those mixed content issues on the fly!
Keep Always Use HTTPS Turned On

This will make sure that if a user doesn’t include the “https” or mistypes “http” instead of “https” while typing your URL on their browser, Cloudflare will automatically redirect them to the secure https version of your site.
Turn On Auto Minify For All Code Resources
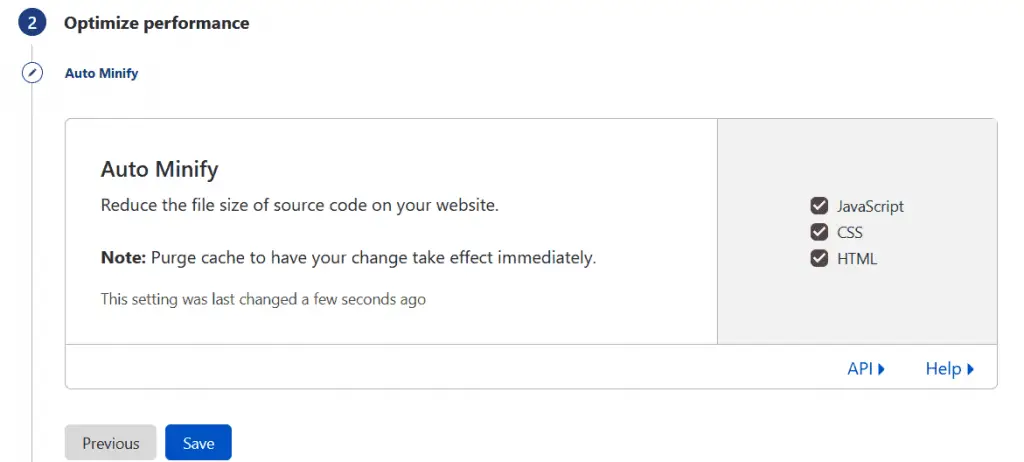
With Auto Minify turned on, Cloudflare will automatically save the minified version of the JavaScript, CSS and HTML of your pages in its cache. Thus, reducing the size of the source code on your website, leading to faster page loads.
Keep Brotli Compression Turned On
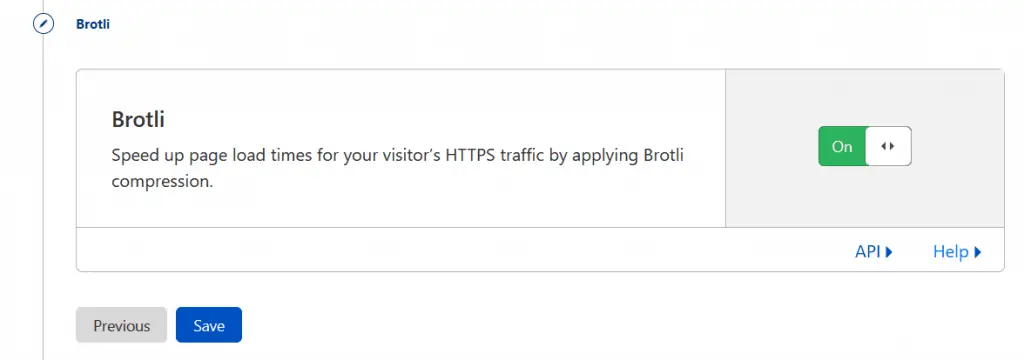
With Brotli compression turned on, Cloudflare will compress your static resources either using GZIP compression, or Brotli, whichever is supported by the client. This reduces the size of your resources and enables quicker load times of your web pages. Learn more about Brotli Compression here.
Verify The Summary
Now verify whether or not your summary matches exactly with the screenshot provided below.
And finally, click on Finish.
[IMPORTANT] Prevent Cloudflare SSL Handshake Failure Error
When used with Blogger, Cloudflare sometimes causes SSL handshake failure which makes the website inaccessible. But it can easily be prevented, here’s how:
1. Turn Off Blogger HTTPS Redirect
Go to Blogger Settings, scroll down to HTTPS and turn off HTTPS redirect.
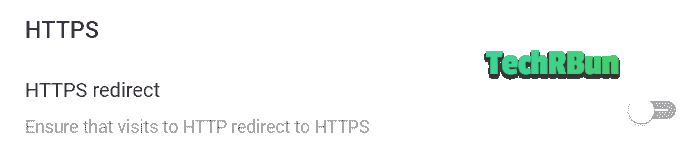
This step is very important, as otherwise, you will face the “too many redirections” error.
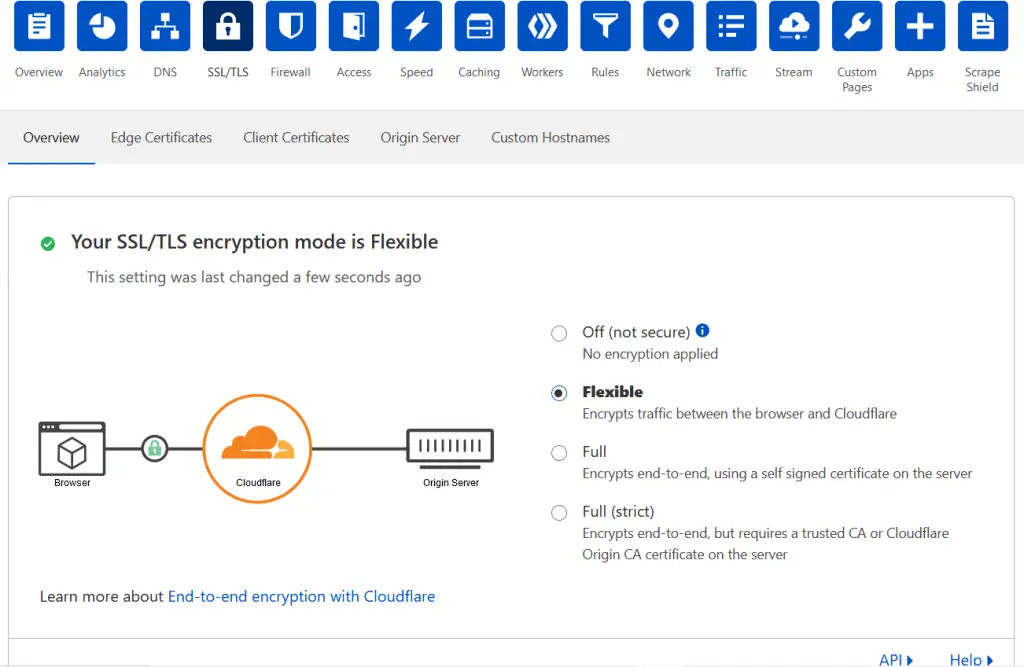
2. Make Cloudflare SSL Flexible
Go to the SSL/TLS page on Cloudflare and select “Flexible” under SSL settings.
3. Make Sure Always Use HTTPS Is Turned On
On the same page, go to the Edge Certificates option and make sure that the “Always use HTTPS” option is turned on.


That’s it! You have successfully prevented any Cloudflare SSL handshake error from occurring.
Congratulations!
You’ve successfully set up Free Cloudflare CDN for your Blogger Blog!
If you’re in India and use the Jio Mobile Network, make sure you check out: How To Fix Cloudflare Sites Not Opening On Reliance Jio Network
Some Cool Extra Features Of Cloudflare
Here are some great extra features that Cloudflare offers for free:
Apps/Plugins Store
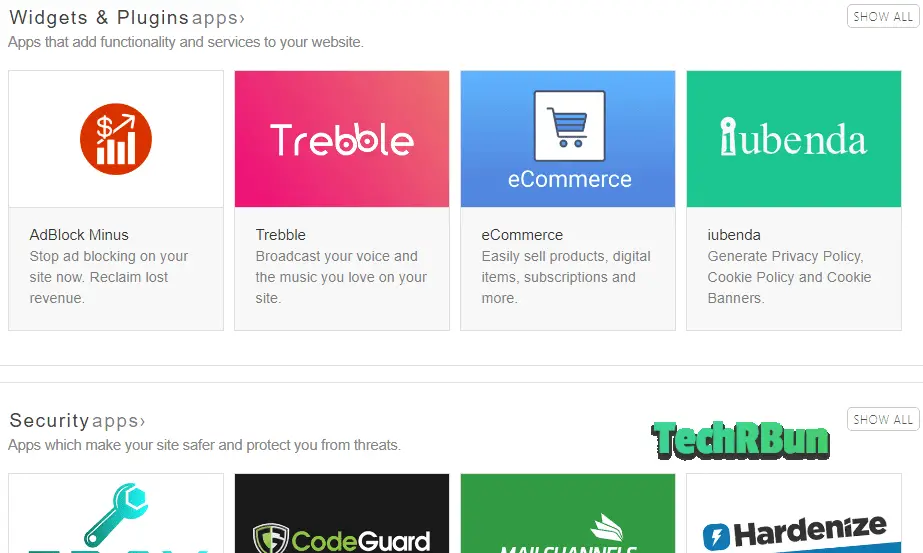
Cloudflare provides an awesome app/plugin store, from where you can install lots of plugins to your website with just one click, no coding needed.
There are some pretty useful apps in the plugins store, such as the “Instant Page” plugin which speeds up your website to a truly next level!
The best part about the plugins store is that no change is made to the code on your server. All the code necessary for the plugins is added to your source code on the fly. You can also deactivate the plugins anytime with a single click of a button.
Progressive Web App
You can also make a progressive web app for your Blogger blog using Cloudflare Workers service. Learn How To Make Progressive Web App (PWA) For Blogger.
Threat Control
Cloudflare allows you to block specific IP addresses and even the traffic from specific countries, from accessing your website.
It also displays a list of IP addresses that were found to be suspicious by Cloudflare and had failed to solve captchas provided by Cloudflare. You can block those IP addresses manually.
Huge Improvement In Page Load Speed
Did you know that visitors tend to close web pages that take a long time to load? Page Load Speed is also a Google Ranking Factor.
Aside from providing the option to automatically minify HTML, JavaScript and CSS on your website, Cloudflare’s Rocket Loader reduces your page’s loading time drastically by loading all the JavaScript on your website asynchronously.
However, according to some reports, the Rocket Loader was found to interfere with some AdSense scripts. I personally have not found Rocket Loader to interfere with the AdSense script in any way. But if you face any problem, you can keep it turned off.
That was the complete guide to set up Free Cloudflare CDN for your Blogger Blog.
Also check out: How To Make Your Blogger Blog Full Width So That it Fits Edge To Edge On Any Display
Do comment below if you have any confusion regarding this article and do share this article if it has helped you. As you know, Sharing is Caring! : )
Tired of slow indexing of your blog posts by Google? Check Out: How To Get Your Blog Posts Indexed By Google Instantly [2 Minutes]

Thank you so much for providing the solution to the "SSL handshake error", now I have finally fixed it. I loved the article and also discovered the "apps" option which I didn't knew about earlier.
Yes, that’s a very important step. Glad to know that my article has helped you configure cloudflare for blogger.
Nice post. Thanks.
I’m glad that you liked it!
After choosing "HTTPS redirect to off and the "Crypto" page of Cloudflare and select "flexible" under SSL settings." it made my site insecure. Therefore, I again went back to "full" instead of "flexible" and "HTTPS redirect to on." Then my site became secured again.
There will be a huge problem if you do that. Believe me, if you keep the SSL to full, you will face ssl handshake errors often and your website won’t even load. What you need to do is, from Blogger settings, turn https redirect off. And in cloudflare settings, put it to flexible and then scroll down more and in cloud flare, you will find the https redirect option, you need to turn that on. Hope this helps you. ?
But again, i am warning you, never put the ssl in cloudflare to full for Blogger blog.
it really helps
I’m glad!
Thanks for this post Roy, it helped me in setting up cloudflare on my blog. although cloudflare have changed some of their UI, i was able to navigate through and get things done.
I’m glad that this article helped you setup CloudFlare on your blog!
Thanks, really helpful. Although recently some UI of Cloudflare has changed but your article is very good and has helped me in setting up cloudflare for my blogspot.
So glad ?
Valuable information. Lucky me I found your web site unintentionally, and I’m surprised why this accident didn’t happened in advance!
I bookmarked it.
Thanks for the sweet comment!
Thanks so much for discussing the SSL handshake error part. This is the best tutorial on Blogger cloudflare integration.
Hai If change the setting from Full to Flexible will it slow down the speed of my blog because its running with a custom domain on blogger platform
Hi Andrew,
No, changing the SSL from full to Flexible won’t have any affect on your site’s speed. I recommend changing it to flexible because sometimes Cloudflare fails the SSL handshake with Blogger and in that case your site becomes inaccessible to your visitors. Thus, it is the best to keep the SSL setting as Flexible in Cloudflare for configuration with Custom domain on Blogger.
Hi,
Thank you for this helpful article, but when I add my website to cloudflare the google adds don’t show. Is it against google policies ?
If not, could you please tell me how to solve this issue.
Thank you.
Hi!
No, using Cloudflare CDN on Blogger is not against Google AdSense policies. AdSense should run fine. Can you please share your URL, so that I can take a look in order to help you out?
Yes, this problem happened with me as well. Why this and how to solve it?
Give it some time to figure out the change in nameserver. Ads will start working automatically after a few hours/days.
I use a blogger site with custom domain and i have done CDN with Cloudflare but my site speed still not improved.Please help me.
My site URL is https://www.panchanakshatrapatrika.co.in/
Hi Atanu, Cloudflare speeds up your site by serving cached data from its high-speed CDNs, which I’ve checked, is working fine.
There are other issues in your site that are causing the slowdown. You may use Google’s PageSpeed Insights tool to find those errors and learn how to encounter them.
Sir your post is excellent, but here I’m facing one problem, as you mentioned above I’d done everything correctly but now I’m facing multiple redirect issue with my website
Please help me
it’s hindiram.com
Hi!
I checked your site. It’s blank. It doesn’t show the “Too many redirects” issue either. You may reach out to me on telegram at bit.ly/joinbloggers for a quicker response.
Status: Failed – HTTPS SSL Certificate failed to be processed due to challenge data not being visible through the public internet. Check your DNS setup. The operation will retry shortly.
Getting this error in Blooger However HTTPS is showing in my website , but when i tried to install inesignal for push messeage it detected no HTTPS , please help me
website-thestudentscloud.in
Looks like you’ve figured it out by yourself. I checked and saw that https is working properly on your site.
Help!!!
failed to lookup registrar and hosting information
You may share your domain name and I’ll try to look up that information for you.
failed to lookup registrar and hosting information.
Domain: http://financialgyani.tk
It’s a tk domain, so its registrar must be freenom.
Failed to lookup registrar Error.
How to Fix It Financialgyani.tk
Very nice post. Nice explanation. Keep on
Thanks!
Hi anirbun, Please Help my Email is [email protected] and domain is Financialgyani.tk
UNABLE TO register it
You should know where you bought/registered you domain from. Sites like Google Domains, Namecheap, GoDaddy, they are domain registrars. People buy the domain from the registrar. As yours is a .tk domain, I guess your registrar is Freenom. So login to your Freenom account, go to the nameserver settings and update the nameserver with Cloudflare’s nameservers which will be shown to you in your Cloudflare dashboard.
but it is not showing on even Financialgyani.tk
Do you remember where you got the domain from? Did you set it up yourself or did someone else do that for you?
I did it my self can you reply me on Facebook.
After reading your article, I have turned Off Blogger HTTPS Redirect and my blog works perfectly. But whenever I’m trying to embed my blog to another blog using HTML iframe tag, it shows me the following error. May you help me?
Mixed Content: The page at ‘https://######’ was loaded over HTTPS, but requested an insecure frame ‘http://#######’. This request has been blocked; the content must be served over HTTPS.
That’s a general security issue. You shouldn’t load non-secure content on your secure site. Try loading your iframe’s content using https protocol instead of http.
Greetings!!
I don’t know if Ezoic has changed something in 2023, but now it mentions a list of ip’s and also add them to a white list so as not to generate 523 type errors.
Also, if I’m using the free blogger https certificate, does that mean I have to change it to cloudflare’s, otherwise I won’t be able to connect my site?
Hello!
You do not need to whitelist any IP if your site is hosted on Blogger. Whitelisting Ezoic’s IPs is required on specific hosting like Bluehost, which might block Ezoic treating them as bots. If you use Blogger’s https certificate, it works initially. But sometimes, Cloudflare fails to recognize the certificate and blocks access to the site if SSL is set to strict on Cloudflare. This behavior is really random and hard to predict. So to ensure that your site is always up and accessible, it’s recommended to turn off Blogger’s SSL and use Cloudflare’s flexible SSL instead.