
Yoast is a very popular SEO plugin that is officially only available for the WordPress platform in the form of a plugin. But today I will share a quick and easy way to install and implement all the important SEO features of Yoast in your Blogger blog.
In this tutorial, I will show examples of the free version of the Yoast SEO plugin but if you want, you can use the paid version of Yoast SEO or any other Yoast SEO alternative like Rank Math or All In One SEO Pack for your Blogger site, too.
Also Check Out: Rank Math vs Yoast SEO: Which Is The Best SEO Plugin?
Thus basically, after reading the complete article, you will get the complete idea of using an SEO plugin for Blogger. Now let’s dig in on How to use Yoast SEO plugin in Blogger!
But wait, before that, do you know that Bliss is the most advanced blogger template out there, which already has all the SEO goodness of Yoast baked in? It’s a clean-coded, beautiful blogger theme that is full of goodness and no unnecessary junk!

Table of Contents
Which Features Of Yoast SEO Can Be Installed Or Implemented In Blogger?
Well, first of all, it’s important to understand that there is no official version of the Yoast SEO plugin available for Blogger sites.
Thus, we can only implement certain features of the plugin, but not all.
However, luckily, we can install and use all the core and important functionalities and features of Yoast SEO in Blogger, which are crucial for ranking #1 on Google.
Benefits Of Installing Yoast SEO Plugin Features In Blogger
The features which you will be able to get by installing the Yoast SEO plugin in your Blogger Blog using the method described in this article, are:-
- Highly optimize your articles with targetted keywords.
- Tell Google exactly what your website is about. You can let Google know whether you’re an individual or an organization, what is your niche, your social media profiles, etc., to enhance your online branding.
- Enhance the readability of your articles to increase the on-page dwell time of your site and reduce the bounce rate.
- Preview how your page would appear in the Google search engine results page (SERP).
- Boost your On-Page SEO with advanced real-time guidance and advice on usage of keywords, interlinking and external linking.
- Maintain good consistency of your focus keywords in your articles to help rank better on Google.
- The plugin will rate your article saying whether it is Good or Bad so that you can always fix your mistakes before publishing the article.
- Stay updated with the latest ranking factors of Google and optimize your On-Page SEO with smart suggestions of the Yoast SEO plugin which are always up to date!
- Make Google crawl your website daily for faster indexing. Also, learn how to get your articles indexed on Google Instantly, under 2 minutes.
How To Get Yoast SEO Plugin Features In Blogger
At first, I will teach you to optimize the overall SEO of your BlogSpot blog for better SERP ranking and online brand recognition.
Then, I will show you how to optimize the On-Page SEO and the readability of your articles using the Yoast SEO plugin (or any of its alternatives) to give a huge boost to your Google rankings.
Overall SEO and Schema
If you plan to create an authority site, branding is very important for your website because not only it enhances the appearance of your website in the SERP, but also creates a long-lasting impression in the user’s mind. Thus, the user always returns to the website when he/she has queries related to the website’s niche, becoming a loyal reader!
A well-branded website always has social media profiles, a professional logo and a good quality overall website structure (navigation menu).
Progressive Web Apps are also in trend nowadays. Those are light easy to create apps of websites. You can also learn how to make a progressive web app (PWA) for your blogger blog.
To attach all this information and guide Google to properly brand your website in it’s SERP, you need to change a setting and add some code to the header of the HTML of your Blogger site.
Enable Custom Meta Description
Go to Settings –> Meta Tags and turn on Enable Search Description. Write a short description of your blog and click on Save changes.
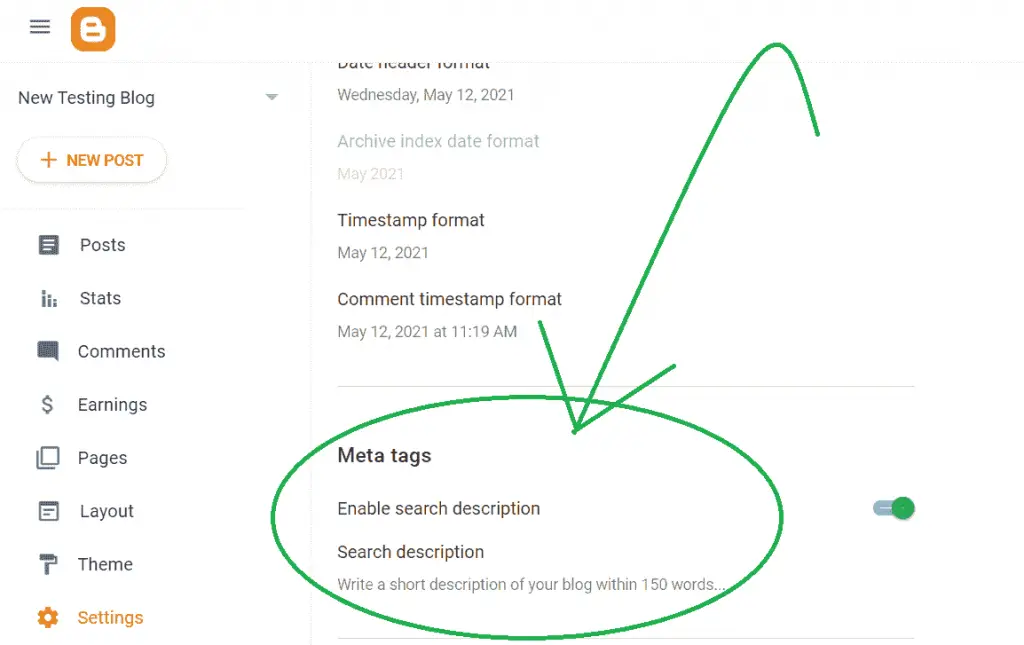
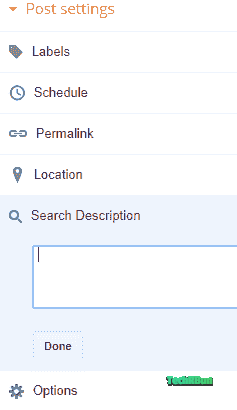
You will see that a new field called “Search Description” has been added to the post settings of every post on your blog. This option is very important for SEO and I will discuss this later in detail later in this article, so keep reading.
Add Some More Meta Tags To The Head Of Your HTML
Now, add the following code to the header of your blog. This code will add some crucial meta tags to your pages that will enhance your site’s listing on the SERP.
NOTE: PLEASE ENSURE THAT THESE SCHEMA CODES HAVE PREVIOUSLY NOT BEEN CONFIGURED ON YOUR SITE. OTHERWISE, SKIP THIS STEP.
Go to Theme –> Edit HTML.
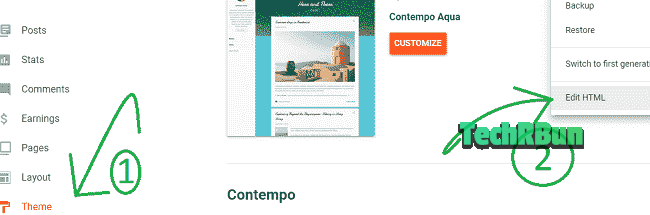
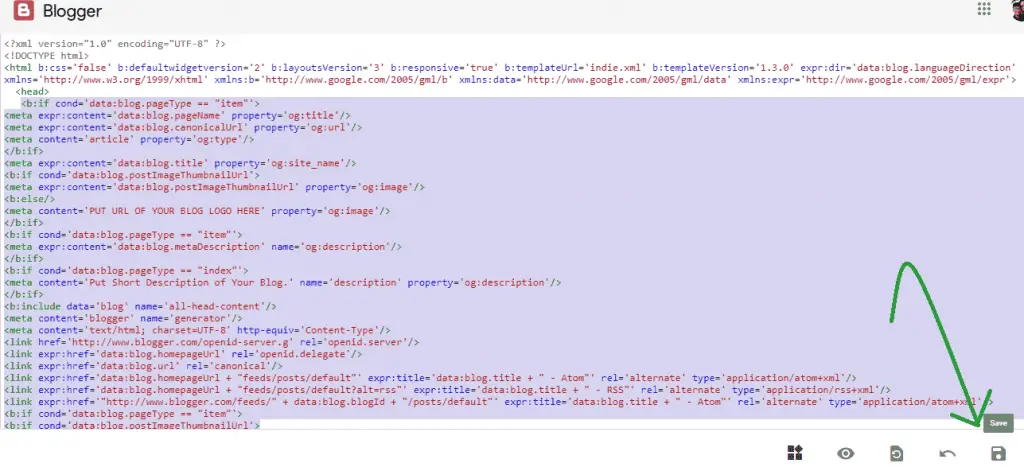
Paste the following code just after the <head> tag.
COPYING AND PASTING THIS CODE DIRECTLY WITHOUT MAKING THE CHANGES THAT ARE MENTIONED BELOW, WILL NOT WORK AND WILL BREAK YOUR SITE. SO MAKE SURE THAT YOU MAKE THE FOLLOWING CHANGES TO THIS CODE AS MENTIONED BELOW BEFORE PUTTING IT TO THE HEAD OF YOUR WEBSITE.
UPDATE: THE CODE HAS BEEN UPDATED. THE SINGLE QUOTES IN CERTAIN PLACES HAVE BEEN REPLACED WITH DOUBLE QUOTES TO PREVENT THE ERROR MESSAGES THAT THE BLOGGER HTML EDITOR WAS PRODUCING WITH THE UNMODIFIED VERSION.
BUT, YOU STILL NEED TO MAKE THE CHANGES MENTIONED BELOW THE CODE SNIPPET TO GET THE PROPER RESULTS.
<b:if cond='data:blog.pageType == "item"'>
<meta expr:content='data:blog.pageName' property='og:title'/>
<meta expr:content='data:blog.canonicalUrl' property='og:url'/>
<meta content='article' property='og:type'/>
</b:if>
<meta expr:content='data:blog.title' property='og:site_name'/>
<b:if cond='data:blog.postImageThumbnailUrl'>
<meta expr:content='data:blog.postImageThumbnailUrl' property='og:image'/>
<b:else/>
<meta content="LINE 10: URL OF THE LOGO OF YOUR BLOG" property='og:image'/>
</b:if>
<b:if cond='data:blog.pageType == "item"'>
<meta expr:content='data:blog.metaDescription' name='og:description'/>
</b:if>
<b:if cond='data:blog.pageType == "index"'>
<meta content="LINE 16: SHORT DESCRIPTION OF YOUR BLOG." name='description' property='og:description'/>
</b:if>
<b:include data='blog' name='all-head-content'/>
<meta content='blogger' name='generator'/>
<meta content='text/html; charset=UTF-8' http-equiv='Content-Type'/>
<link href='http://www.blogger.com/openid-server.g' rel='openid.server'/>
<link expr:href='data:blog.homepageUrl' rel='openid.delegate'/>
<link expr:href='data:blog.url' rel='canonical'/>
<link expr:href='data:blog.homepageUrl + "feeds/posts/default"' expr:title='data:blog.title + " - Atom"' rel='alternate' type='application/atom+xml'/>
<link expr:href='data:blog.homepageUrl + "feeds/posts/default?alt=rss"' expr:title='data:blog.title + " - RSS"' rel='alternate' type='application/rss+xml'/>
<link expr:href='"http://www.blogger.com/feeds/" + data:blog.blogId + "/posts/default"' expr:title='data:blog.title + " - Atom"' rel='alternate' type='application/atom+xml'/>
<b:if cond='data:blog.pageType == "item"'>
<b:if cond='data:blog.postImageThumbnailUrl'>
<link expr:href='data:blog.postImageThumbnailUrl' rel='image_src'/>
</b:if>
</b:if>
<meta content="LINE 36: YOUR NAME" name='Author'/>
<meta content='general' name='rating'/>
<meta content="LINE 38: WEBSITE'S OFFICIAL E-MAIL ID" name='email'/>
<meta content="LINE 39: YOUR SITE'S OFFICIAL TWITTER URL" name='twitter:site'/>
<meta content="LINE 40: YOUR SITE'S TWITTER USERNAME" name='twitter:creator'/>
<meta content='en_US' property='og:locale'/>
<b:if cond='data:blog.pageType == "index"'>
<title>LINE 43: TITLE OF YOUR BLOG</title>
<b:else/>
<b:if cond='data:blog.pageType != "error_page"'>
<title><data:blog.pageName/></title>
</b:if></b:if>
<b:if cond='data:blog.pageType == "error_page"'>
<title>Page Not Found - <data:blog.title/></title>
</b:if>
<meta content='global' name='distribution'/>
<meta content='1 days' name='revisit'/>
<meta content='1 days' name='revisit-after'/>
<meta content='document' name='resource-type'/>
<meta content='all' name='audience'/>
<meta content='general' name='rating'/>
<meta content='all' name='robots'/>
<meta content='index, follow' name='robots'/>
<b:if cond='data:blog.pageType == "archive"'>
<meta content='noindex' name='robots'/>
</b:if>
<b:if cond='data:blog.searchLabel'>
<meta content='noindex,nofollow' name='robots'/>
</b:if>
<b:if cond='data:blog.isMobile'>
<meta content='noindex,nofollow' name='robots'/>
</b:if>
MAKE THE FOLLOWING CHANGES TO THE ABOVE CODE:
- At Line 10, replace “LINE 10: URL OF THE LOGO OF YOUR BLOG” with the original URL of the logo of your blog. You can upload your blog’s logo in a draft post and then right-click on the image to copy its URL.
- At Line 16, replace “LINE 16: SHORT DESCRIPTION OF YOUR BLOG.” with a short description of your Blog.
- At Line 36, replace “LINE 36: YOUR NAME” with the Name of the primary author who posts articles on your blog.
- At Line 38, replace “LINE 38: WEBSITE’S OFFICIAL E-MAIL ID” with the real e-mail id of your blog.
- At Line 39, replace “LINE 39: YOUR SITE’S OFFICIAL TWITTER URL” with the real URL to the official Twitter profile of your site.
- At Line 40, replace “LINE 40: YOUR SITE’S TWITTER USERNAME” with the username of the official Twitter profile of your blog (without the @ sign).
- At Line 43, replace “LINE 43: TITLE OF YOUR BLOG” with the title of your blog.
Note: The code won’t compile unless you make the above changes!
Paste it to your Blogger blog’s HTML as shown below:
On-Page SEO And Readability
Done with the settings and coding part, now it’s time to learn how to use the advance On-Page SEO boosting tools on Blogger, that Yoast SEO provides.
For this, you need to create an offline WordPress (free) site which will be hosted on our computer’s local host.
Setup WordPress On Your Local Host (Free)
Download and install the Bitnami WordPress Stack Installer [available for Windows, macOS and Linux) on your computer using the tutorial given below.
Tutorial For Windows

Tutorial For macOS

If you’re a Linux user, kindly look up the tutorial for your specific distro.
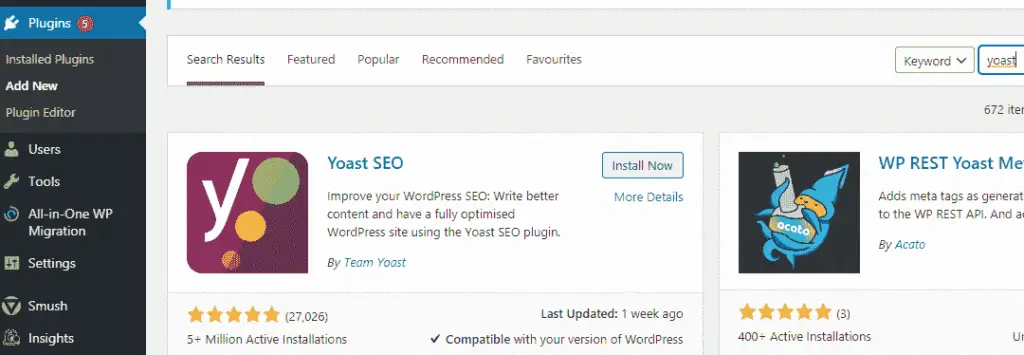
Now login to the Dashboard of your demo WordPress site and go to Plugins –> Add New. Search for “Yoast“. Click on Install Now. Then Activate It.
Now, all you need to do is, before publishing any post, copy and paste the whole article into a new post of the dummy WordPress and optimize your article according to the suggestions provided by the Yoast SEO plugin.
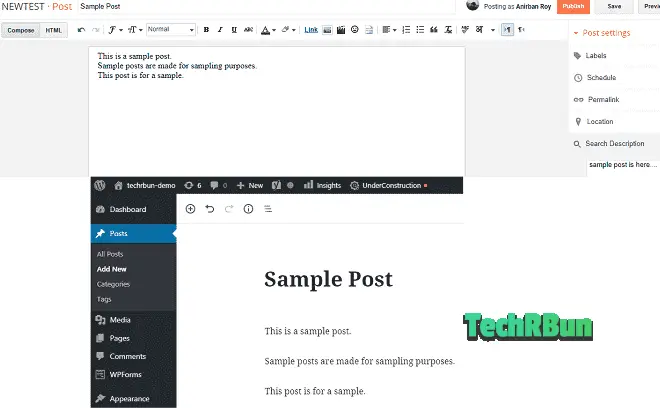
So first of all, let’s copy an article from Blogger to the demo WordPress site.
Also, scroll down and copy the “Search Description” from Blogger to the “Meta description” field of Yoast.
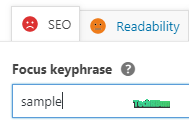
Now, let’s suppose that this article was meant to target the keyword “sample“. Thus, put the target keyword in the focus keyword field of Yoast.
Now, as you can see, there are unhappy faces besides SEO and Readability.
Our target is to optimize our article in such a way that both the faces turn happy green.
Now scroll down and click on the SEO Analysis drop-down menu.
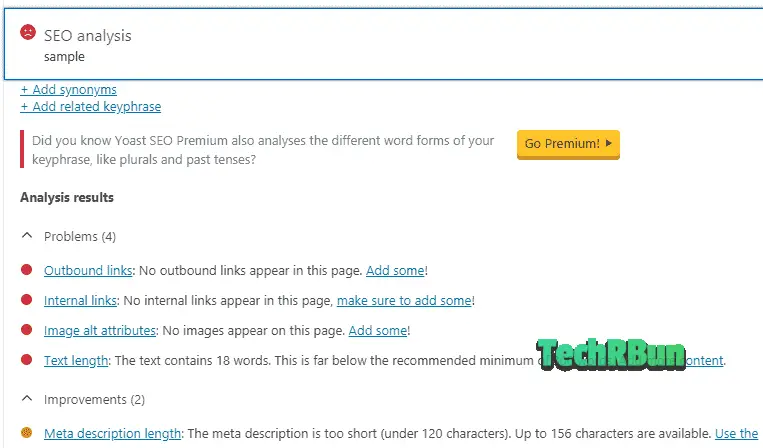
Here you will see all the mistakes that are there in your article. You need to fix those mistakes one by one in your article so that its On-Page SEO gets brushed up.
After fixing all the SEO related problems that Yoast SEO points out in your article, the red unhappy face beside the SEO Analysis button must turn into a happy green one.
Then click on Readability.
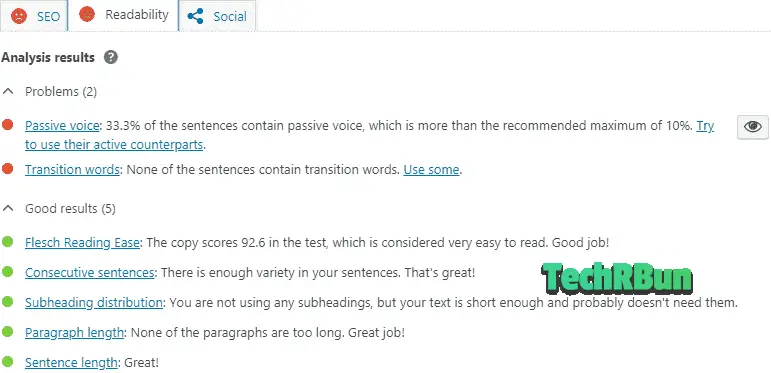
Now fix all the readability issues that Yoast SEO suggests in your article. You can click on the eye button to locate the exact line where the problem is on. Make the face beside the Readability button turn green as well!
After fixing all the SEO and readability issues in your article, just copy the article from WordPress again and paste it to Blogger and then publish it!
I would suggest you optimize all your old articles and as well all the new articles that you will publish in the future, using this method.
Note that there might be temporary loss of rankings when you update your articles but they will soon be back to the top again.
Congratulations!
You’ve successfully SEO optimized your Blogger blog and will see the huge growth in your rankings and organic traffic, soon! Keep creating quality content!
If this article has helped you use the Yoast SEO plugin in your Blogger blog, kindly consider sharing it on your favorite social media!
If you have any doubts regarding this article, feel free to comment down below.
Have a great day ahead!


I installed this yesterday and now my website is broken…
Hi Izzy,
That shouldn’t have happened, I have installed the same script on many blogger sites before, Moreover those are meta data and technically they cannot break your website. I am sure there must have been some mistake, the code must have been put in the wrong place or maybe within the closing tag of some other code.
If you want, I can take a look at your website and help you fix it. I will be happy to help you. You can leave your website’s address in the comment in the following format yoursite[dot]com (don’t put the period.).
Thanks.
Because you forgot a MAJOR PART that we ALREADY have Search description enabled!!!!!!!!!!!!!!!!!!!
Please sort this article as per the recent changes in Blogger.
Thanks for pointing it out! Will update it ASAP! 🙂
Please review and fix the SEO problems in my blog.
HERE’S THE LINK: interestingtimes2021.blogspot.com
Izzy, please make sure that you have actually edited the code. The code that is given their needs to be edited with the original information of your website. Just copying and pasting it won’t work. Please edit the code as I’ve explained in the article under the heading “Make the following changes to the above code”
Thanks a lot. I tested this code for 1 month and the results were amazing. Now I have also started to get featured snippets from Google. Even the dwell time on my site has gone high. And the Yoast editor in WP part was really clever. Great article! Keep up the good work.
please share your web url
you are nice bro
Thank you! 🙂
Hey ! Anirban,
I want to install yostseotool on my blog and as per your instructions I’d made require changes by replacing my details in it. however at the time of pasting I could not understand the exact field to paste it..viz. If I am pasting yost seo tools changed HTML code from Head Section but I could not understand to paste it till end of HTML section or else? So Please guide me in this matter. Thanking you.
Hi Mahendrakumar!
Copy your blog’s HTML code in Notepad and then using the CTRL+F command, lookup for “” (without quotes). Paste the code before the .
But, before pasting, make sure that you the necessary changes to the code as mentioned above in the article. That is, replace all the demo code with the original info of your website, as I have mentioned above in the “MAKE THE FOLLOWING CHANGES TO THE ABOVE CODE:” section of the article. If you do not make the required changes, the code won’t save and might break your site. So, making the changes is very important.
Hope I was able to help!
Thank for the awesome content, I think these factors is also important for SEO and Google ranking
🙂
This article is quite insightful. I like the part of the lead scoring model.
I’m so glad that you liked it, Dirk!?
Thank you so much.
I just did it and it works, hoping to see positive results.
I’m glad!?
Can you please post a sample video how to create duplicate blog in wordpress.com of my google blog? It will be very helpful
Hi Bhrigu,
First of all, it’s not “WordPress.com” you need to create a demo WordPress self hosted site, i.e. WordPress.org
And I can make the video but it can take a long time for me to make it, so I cannot guarantee when the video will be available.
But thanks for your suggestion, I will try my best.
You can also tell me exactly where you’re facing the problem and I can help you out.
Thanks again, I will definitely work on the video.
You can actually have a local version of wordpress on your laptop/pc and make full use of Yoast and other free WP plugins.
WHAT… AN… AWESOME… POST! Well done ?
Thank you, Samual!
The code that you give dosnt work on my blospot there is a mistake in this code .
The code has been tested and it works.
It won’t work if you simply copy and paste it. Please make sure that you have made the changes to the code as explained in the article.
If you still face any problem, kindly take a screenshot of your problem, upload it to imgur or any image hosting site and leave the link in the comment here. I will check it and help you out! 🙂
Ok it work fine now .
Please can you tell me
Will this code affect the old meta codes because the template I use also contains Meta codes, and will it affect the archiving of old posts ?
I have default meta tag what can I do in this case ?
Replace the duplicate meta tags with the ones provided in this code.
Great post, I really think that building relationships with others is the best way to get noticed and discovered in the blogosphere.
Yes, it is! But building backlinks through commenting on other’s sites is a black hat practice and is the easiest way to get your site penalised by Google. 🙂
hey, I am not able to save the code. There is nothing happening after I have made changes in my html code. Can you please help?
Hi Mahima,
Have you made all the changes to the code, as I have instructed in the article?? The code won’t work unless you make those changes. You need to replace the opening and closing quotation marks with just ” if it still doesn’t save even after making the changes.
If even after this, the code fails to save, please e-mail me at [email protected] or, upload the screenshot of the error that you’re facing to imgur, and leave the link in the comment here.
I will check it and help you out!
Hey Anirban
Recently I Installed This Code In My Website And That’s Working Buddy.
I Have Question that how much time it takes to reflect result in ranking of website.
Thank You
Hi Meghraj,
The code starts working as soon as you add it. However, it will show affect only when Google re-indexes your site automatically. It will then detect the new meta tags. Also, the plugin just enhances you SEO, higher ranking is directly proportional to the competition of your target keyword and the quality of your content. Make sure you use the auto article editor feature of the plugin using a free host to get the maximum benefits, as explained in the article.
Will it overwrite seo setting mage with default available options.
I didn’t fully understand what you meant to ask, but I guess you’re asking if the already existing meta tags would be overwritten or not. If your template has SEO meta tags inbuilt, you would need to manually replace them by the ones given in this code.
Most importantly thank you for posting on this point with awesome clarification.
wow, you are amazing bro….I am the beginner in blogging…I want to try this…I will let you know if find any difficulties, Please help me….and you are ready to help others too…really I appreciate you…
sure, bro!
Great job here, the search description box will appear after inserting the code as you have mentioned, I already have it without inserting the code. Does that implies that I don’t need to undergo the process again? Or to only proceed to opening a dummy WordPress blog?
The search description box needs to be enabled through Blogger settings and it has no relation with the code. It helps you provide a snippet for your page to Google.
You need to install the code to get the optimal results.
Hiii, I already have the search description box even if I haven’t inserted the code. Though I have never inserted such codes before in my blog. My question is should I still go ahead and insert the code?
Yes, you would still have to insert the code. The search description box is provided by Blogger itself, that’s not the function of this code.
The purpose of this code is to add the required metadata (that Yoast puts on WordPress sites) to make your site more SEO friendly.
Thanks alot sir…….i did as you instructed, follow through only had issues with the inline link and i’m thinking its because my demo wordpress has no post to link too thats why its flagging me…..Thanks alot once again
sir i’m still not ranking
Hey Dave, whether your site ranks or not, directly depends on your content. If you target less competitive keywords and write high-quality content, you will surely rank.
The SEO plugin cannot rank your site automatically. Its task is to present all your pages in a way such that it’s easy for Google to understand what your site is all about and thus, it increases the chances of your site to rank better.
Wow very helpful content. Now i know how can i use Yoast seo plugin for blogger to optimise my content as well thanks man.
Hello Roy, Nice Article, But it is not working for my site, I have changed data as per my blog.
Showing error as below
org.xml.sax.SAXParseException; lineNumber: 37; columnNumber: 3; The content of elements must consist of well-formed character data or markup.
Most probably that’s due to the quotation marks. Replace those by ‘.
After I’ve optimised my post in Yoast SEO in the fee hosted WordPress, I’ll now copy the post and paste it in my blogger article section right?
Yes, that’s correct.
This Error We are facing during adding this yoast seo code implement on blogger ( org.xml.sax.SAXParseException; lineNumber: 36; columnNumber: 3; The content of elements must consist of well-formed character data or markup. ) Please Tell Me How To Fix This
Hi there! It’s probably because you didn’t edit the code as instructed in the blog post. You need to remove the sample data and your actual data, inside quotation marks, wherever appropriate. If you believe you’ve already made the edits correctly and still receiving error, go to pastebin.com and paste your edited code there and leave a link to it here. I will check it out and let know what’s wrong with it! 🙂
error occurs….saying “xml document structure must start and end within the same entity”. please help
You may put your modified code on PasteBin and leave its link here. I will check out the code and let you know what changes are required.
Excellent and well-written post. Really Helpful for me truly appreciate your hard-work. Thanks For sharing .
Error:
org.xml.sax.SAXParseException; lineNumber: 36; columnNumber: 3; The content of elements must consist of well-formed character data or markup.
Pastebin: https://pastebin.com/7UtJc6dd
The comment “METAS” is in invalid format. Kindly replace the (line 32 on pastebin) with <!– METAS –>
That should fix the problem! 🙂
I tried to paste and save the code, but I have this error notification on my blogger blog saying, org.xml.sax.SAXparseExcrption line Number: 5; column Number 164: the element type “meta” must be terminated by the matching end-tag ”
https://pastebin.com/k56H9izP
Please how can I resolve this.
Hi Assumpta, your code had errors at multiple places. Your meta content values were not wrapped around with qoutes and the meta tags didn’t have proper ending. I have fixed those errors and you can find your error-free code here: https://pastebin.com/SxTXtREv
Thanks alot, I have updated it and it went through. I appreciate your help.
I’m glad to hear that! 🙂
Hi, thanks for the good article, I am planning to apply this to my blog, I was wondering about the changes: shall it be
“LINE 16: SHORT DESCRIPTION OF YOUR BLOG.” –> “My daily thoughts“
I mean shall I keep the ““ or not?
yes, you need to keep the quotes.
To be honest I found that the search criteria exists in blogger already. I tried to make a free WordPress as you advised, but it seems that it is not possible to use Yoast in the free version and must upgrade to a paid version. I would rather had made my blog in WordPress if this feature was free!
Hi Jasmine,
The custom search description exists in blogger and this article recommends you to keep it turned on (most probably it stays ‘on’ by default on the new version of Blogger).
The code that is provided in the article is not for enabling the search description, but it is to add some crucial meta data to your site to enhance your SEO on the whole site level (not just page level, which the custom search descriptions field allow you to do). Hope it is clear now.
About the Yoast SEO plugin, it is a FREE plugin unless you’re opting for the PRO version. If you’re trying to install it from the WordPress plugin repository and it’s asking to pay for it, then most probably it’s some trick implemented by 000webhost trying to rip off the user. I will check it out if that is the case. It wasn’t the case at the time of writing this article. Thanks a ton for pointing it out. I will update the article with a better, offline alternative.
You can install the WordPress software on your computer and use it offline (on your local host) completely free using the Bitnami WordPress stack. I am confident it won’t use any tricks to ask you to pay for Yoast SEO as long as you install it from the official wordpress plugin repo.
I will be replacing 000webhost with Bitnami WordPress Stack Offline, in the article as well.
Am getting an error
Base on the line and meta
Could help me fix it in my site?
I could send you the details privately
Okay bro i got the new code
The thing now is that my blog is still working but theme is been said said to be modify and unavailable
My further question, is the code place the way
<b…..
Or
<B……
Please reply fast
I didn’t completely understand what you’re trying to say. About the code, I guess you’re talking about the if tag in Blogger. Unlike HTML, blogger tags are case-sensitive. Thus, you need to use the lower case letter b and not B.
My website is www.goldnationblog.blogspot.com
Kindly search if it showing
Is it necessary to add Twitter ID? Can I skip that part?
It’s not mandatory. You can skip that whole line if you do not have a Twitter account for your website.
Pls I can’t find the code again I this blog page
The code is right here
Please, I can’t find the code again on this blog page.
I place the code in and hit save then it pops up like this:
The widget settings in widget with id AdSense1 is not valid. An internal error occurred. Please try again.
What should I do next? Please help, thank you so much.
I would have to take a look at your source code. You may upload it to pastebin and share a link here.
but now Free wordpress site doesnt allows Installing Yoast SEO plugin
Use the localhost method I described. It will be installed on your own computer. Completely free and no restrictions at all.
That’s Great Content:)
Thanks for Sharing with us… regards SEOVidya:)
Hello.
I have been trying to integrate the prepared code to my site but is not integrating. Please help me check may be the mistake is from my end. Here is the link.
https://pastebin.com/jBEZ88YJ
Hello.
Please sir I have been trying to integrate the prepared code to my site HTML, but am facing difficulty.
Please take a look at it in the link below. Pls help me out.
https://pastebin.com/jBEZ88YJ
Hello Assumpta,
The pastebin link contains incomplete code. Kindly paste your entire site’s code so that I can trace the issue.
Mine is telling me this
org.xml.sax.SAXParseException; lineNumber: 73; columnNumber: 75; The reference to entity “s” must end with the ‘;’ delimiter.
There must be a problem with the edited version of your code. Upload the snippet on pastebin and comment down the link here, I’ll check it and help you out.
Thanks for sharing this informational blog. It will be very helpful for me. Keep posting.
Hello am having problems with my blogspot I need your help
Feel free to comment your queries here, or reach out to me via e-mail.
how do i make my blogpost to show on google front page
Hi sir I found this post much helpful and im Geeting inspired by u after reading your posts so finally I’ve launch my blog plz detect problem on my blog and sir plz tell me how can I make it proper… Thanks again. My blog link:- https://techotips24.blogspot.com/
Sir may be you are thinking that I’m promoting my blog but if comment is under moderation don’t publish it and plz do visit my blog blog.. and if you you want to post this then you can post this comment… Thanks.. yours sincerely. Techrburn.com user
Hi Vishal,
I would suggest you to target less competitive and long tail keywords. The kind of content on your site right now is least likely to get any organic traffic from Google, considering the authority of your site in your niche.
Ohk sir.. thanks once again for your suggestion… Right now I’m preparing for NEET 2024 so I’m not getting much time but then also I’ll really try to take out time for my hobby (blogging)…
Excellent post with excellent information!Thanks for sharing the important information with us. I really enjoyed reading this blog.
Hi there,
Thanks for your great article.
I have fashion blog on blogger. I wanted to ask you, do you think it is better to migrate from Blogger and go to WordPress or shall I do what you said above and continue? Also will I love my adsense when I migrate from blogger to WordPress? Thanks in advance
I would recommend you to stay on Blogger until you’re making enough revenue to be able to pay for a good WordPress hosting and then some more to keep for yourself. When you reach that level of income on your site, switch to WordPress. Get a good hosting plan, and apply for Ezoic. Ezoic will pay you much more than AdSense. However if you wish to stay with AdSense, you can keep it too. No problem with that. You can check out my Easily Shift From Blogger To WordPress [No Traffic Loss] article to better clear your doubts regarding the migration process.
Hi,
I am new to the blogging business. Can you help me to install yaost SEO to my blog: https://www.forexmarketínformations.bogspot.com
Thanks
Lim Hoo Chon
Sure! at TechRBun Hire we do offer this service. Kindly get in touch with us: https://www.techrbun.com/hire/enquire/. It’ll cost you $2 to use our premium service.