
Many brands create Progressive Web Apps (PWA) for their websites, to enable users to install the super lite web app on their smartphones and enjoy a native app-like experience while browsing that site.

Progressive Web Apps are also great for branding, as once a user installs it, it stays on their Home screen and the brand’s logo stays in the user’s mind.
There’s a rumour on the internet that Progressive Web Apps cannot be made for Blogger. But today I am going to prove that wrong.
In this article, I am going to show you how to create a Progressive Web App for Blogger to let your readers enjoy a native app-like experience on your blog/website.
Table of Contents
- 1 What are Progressive Web Apps?
- 2 Steps To Make Progressive Web App For Blogger
- 2.1 1. Get The Correct Favicons
- 2.2 2. Compress The Images(Optional Step)
- 2.3 3. Upload The Pictures To A Draft
- 2.4 4. Create The site.webmanifest File
- 2.5 5. Upload The site.webmanifest To An Online Storage
- 2.6 6. Create A Page To Be Used By The PWA When Device Is Offline
- 2.7 7. Set Up The Service Worker Using Cloudflare Workers
- 2.8 7. Add The Links And Scripts To Your Blog’s Source Code
What are Progressive Web Apps?
Ever noticed a “Add to home screen” pop up in Google Chrome when you visit some websites? Well, that pop up is shown when a website supports PWA.
When you click on the “Add to home screen” button, the website’s logo is added to your phone’s home screen.
To learn more about PWAs, check out this article.
Demo

If you are reading this article on your mobile phone, simply tap on “Add to Home screen” from the menu (chrome menu) and then tap on “Add“. Then you will see that TechRBun’s PWA has been added to your phone’s home screen and when you open it, you will be able to use TechRBun.com just like any other app on your phone.
Well, now that you have got a clear idea about what a PWA is, let’s get started with learning how to make a Progressive Web App for a Blogger site.
Steps To Make Progressive Web App For Blogger

Massive update! Now it’s possible to serve the Service Worker in your Blogger PWA. Thus, your Blogger blog’s PWA will now support Offline Pages And Installation Pop-Ups!
Please note that for a full-fledged PWA along with Service Worker support, you blogger blog needs to have a custom domain and needs to be connected to Cloudflare. This is because blogger doesn’t allow us to upload files in its directory, thus we need to upload the serviceworker.js file in our site’s directory using Cloudflare Workers.
I would like to provide credit to Marwanto606, where I first saw the deployment of PWA’s service worker using Cloudflare Workers.
If you have a custom domain but have not connected your blog to Cloudflare yet, please do so first. Here’s the tutorial: How To Set Up Cloudflare For Blogger Blog [Easy]
1. Get The Correct Favicons
This is the most important step that you need to perform to make a PWA for your blogger blog.
Go to https://favicon.io (this is the best site I have found till now for this purpose)
If you already have a nice logo for your website, choose the “Generate from Image” option or else you can choose the “Generate from Text” option.
Quick Tip: If you are using the “Generate from text” option and want the background of your logo to be transparent, change the background colour value to #FFFFFF00
Download the zip file on your computer and extract the following files into a folder:
- favicon-16×16.png
- favicon-32×32.png
- android-chrome-192×192.png
- android-chrome-512×512.png
- apple-touch-icon.png
- site.webmanifest
2. Compress The Images(Optional Step)
You can optimize those images to reduce their size for faster loading time, using tinypng.com
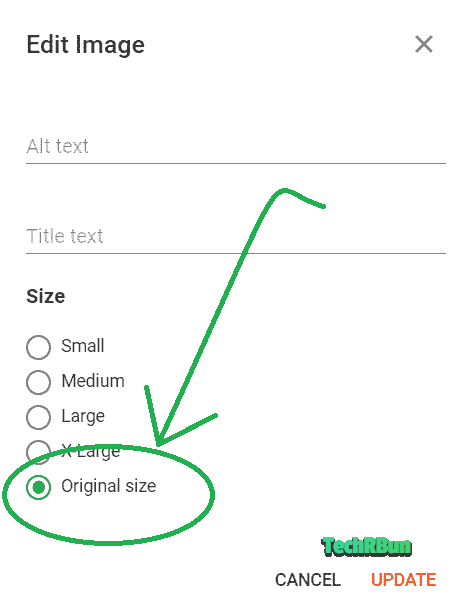
3. Upload The Pictures To A Draft
Go to blogger.com and create a draft post and upload the extracted pictures ( to this post in the original size.
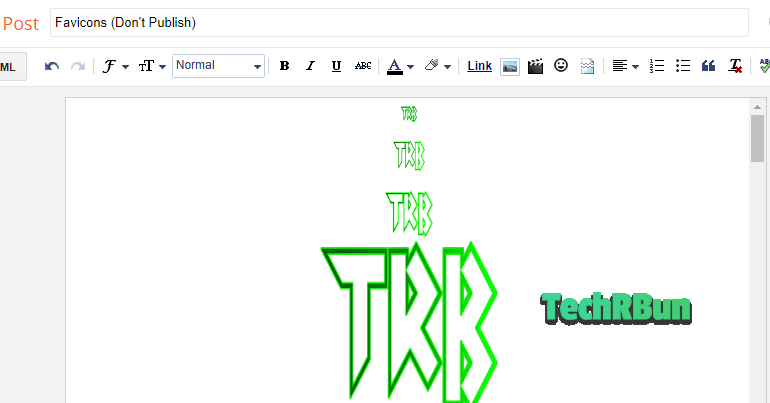
And save the post (make sure you don’t publish it).
4. Create The site.webmanifest File
Right-click on the site.webmanifest file and click on Edit (open it with Notepad or any other text editor).
Delete all the content inside the site.webmanifest file. Select all with CTRL+A and hit the Delete key.
Now copy the code given below and paste it inside your site.webmanifest file.
   {
    "name": "TechRBun",
    "short_name": "TechRBun",
    "icons": [
        {
            "src": "https://1.bp.blogspot.com/-d0C_O0mrXeY/YLQVHUEqGnI/AAAAAAAAx7k/tJ3KDbg9WKEkRCMqJwrkYUFpziIYR1wGgCLcBGAsYHQ/s0/android-chrome-192x192.png",
            "sizes": "192x192",
            "type": "image/png",
            "purpose": "any maskable"
        },
        {
            "src": "https://1.bp.blogspot.com/-WnA3PC1IzNs/YLQVHTwbu_I/AAAAAAAAx7s/2JmVQL0QGekRlnCa4bzjKhWXOQNMXcLWQCLcBGAsYHQ/s16000/android-chrome-512x512.png",
            "sizes": "512x512",
            "type": "image/png",
            "purpose": "any maskable"
        }
    ],
    "theme_color": "#ffffff",
    "background_color": "#ffffff",
    "display": "standalone",
    "prefer_related_applications": false,
  "start_url": "https://www.techrbun.com"
}
Replace the TechRBun name and short_name with your own blog’s name.
To find the link, simply right click on the picture and click on copy image address.
In the third instance, replace (link to your 192×192 icon) with the actual link of the 192 x 192 sized favicon that you uploaded to the draft post (without braces).
Next, you’ll find two instances of “src”:.
In the fourth instance, replace (link to your 512×512 icon) with the actual link of the 512 x 512 sized favicon that you uploaded to the draft post (without braces).
In the last line, change “start_url”: with your own blog’s URL.
Finally, save the file.
5. Upload The site.webmanifest To An Online Storage
This article has been updated here. DriveHQ is no more supported, thus it has been replaced with GitHub.
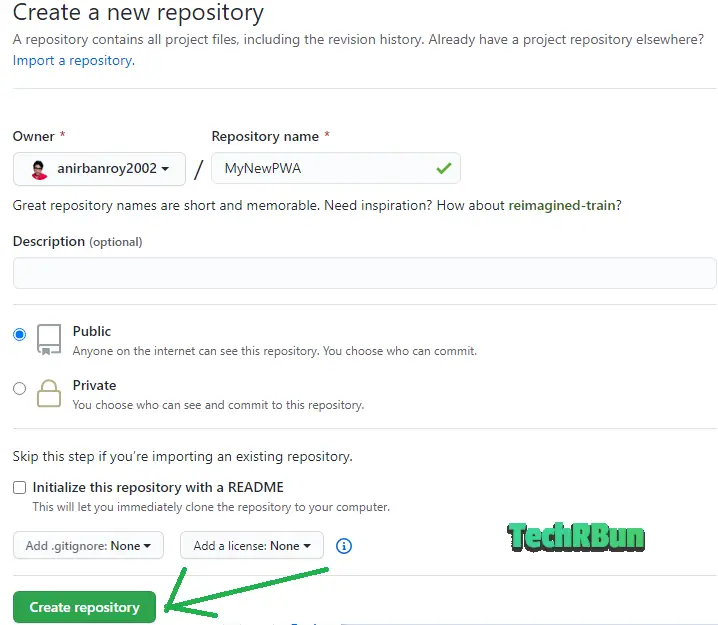
Go to GitHub and sign up.

Now create a new Repository.
Give your Repository any name you want and set it to public. Then click on Create repository.
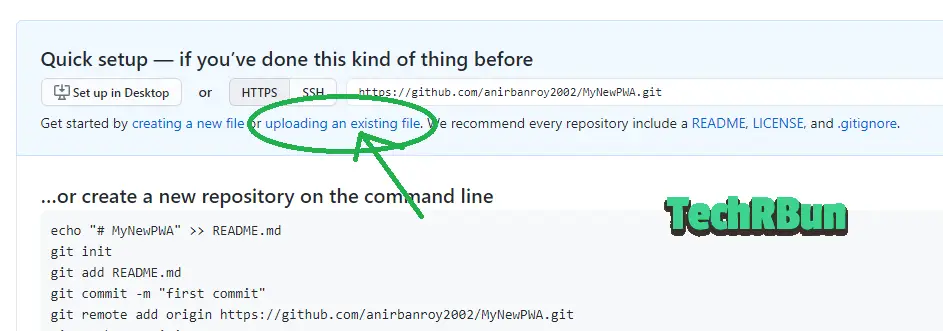
Upload the site.webmanifest file using the “uploading an existing file” link.
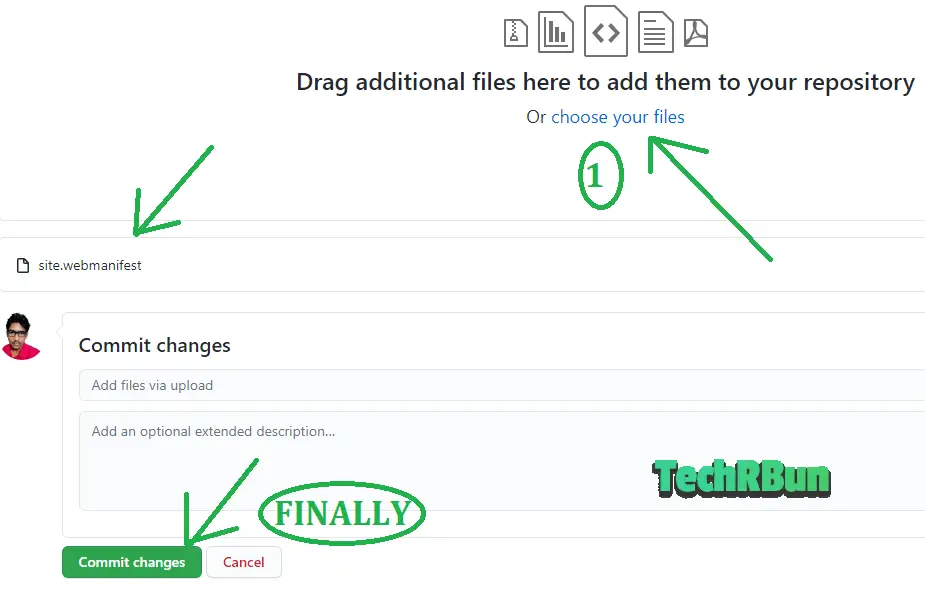
Now click on “choose your files” browse the site.webmanifest file and upload it. Then click on “Commit changes”.
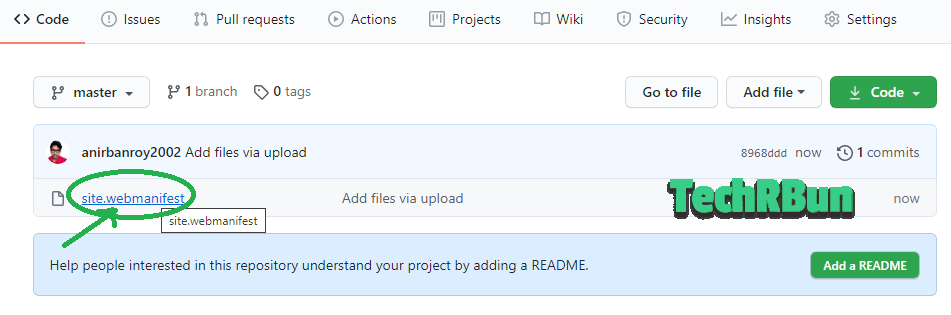
Now click on the site.webmanifest file from your repository.
Then, open the raw site.webmanifest file by clicking on Raw.
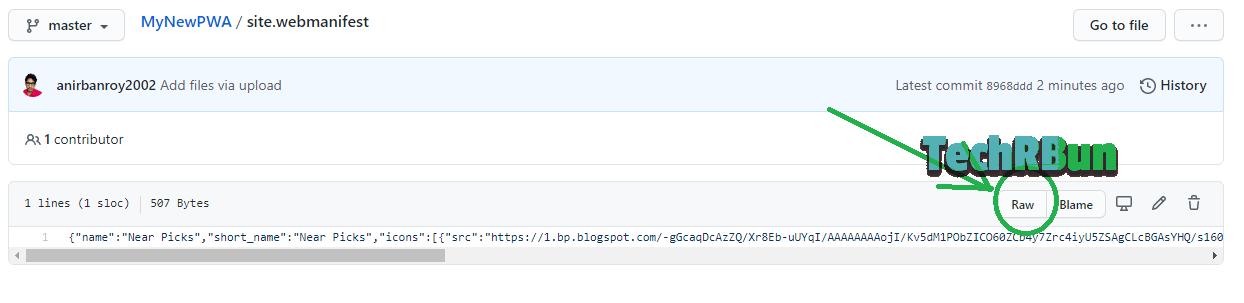
Now copy the URL of the Raw site.webmanifest file for you PWA.
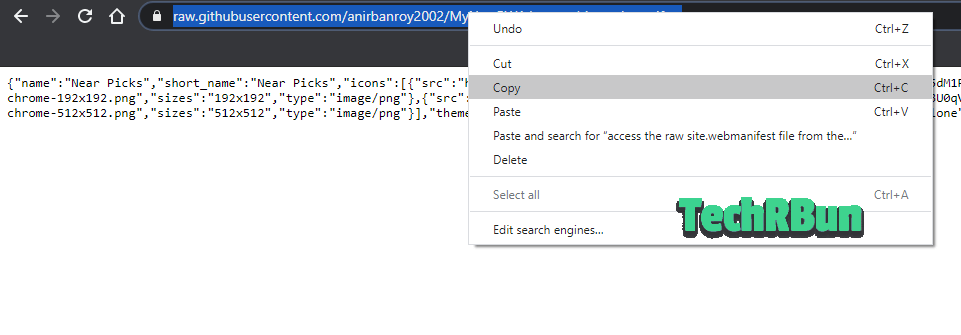
Copy the link and paste it to Notepad so that you can use it later.
6. Create A Page To Be Used By The PWA When Device Is Offline
Create a new page on your Blog with the title – “Offline Page For PWA”. You may write anything in the body as you wish.
This page will be shown to the user when they open your PWA while their device is not connected to the internet.

Publish the page and take a note of its URL.
7. Set Up The Service Worker Using Cloudflare Workers
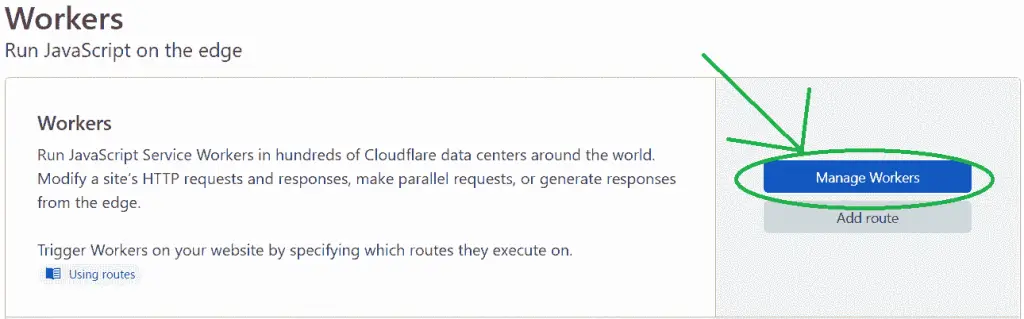
In this step, we’ll be setting up the serviceworker.js file for our PWA using Cloudflare Workers.
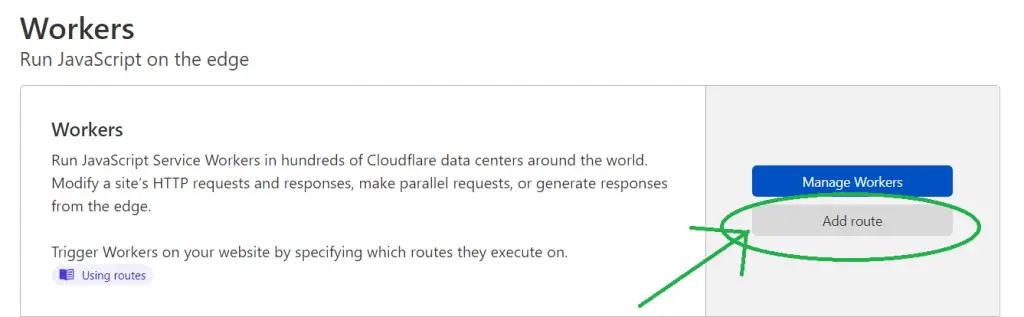
Login to your Cloudflare account, select your blog and click on Workers as shown in the image below.

Now click on the Manage Workers option.
Now choose a subdomain for your Cloudflare Worker. The subdomain can be anything you like, it doesn’t matter.
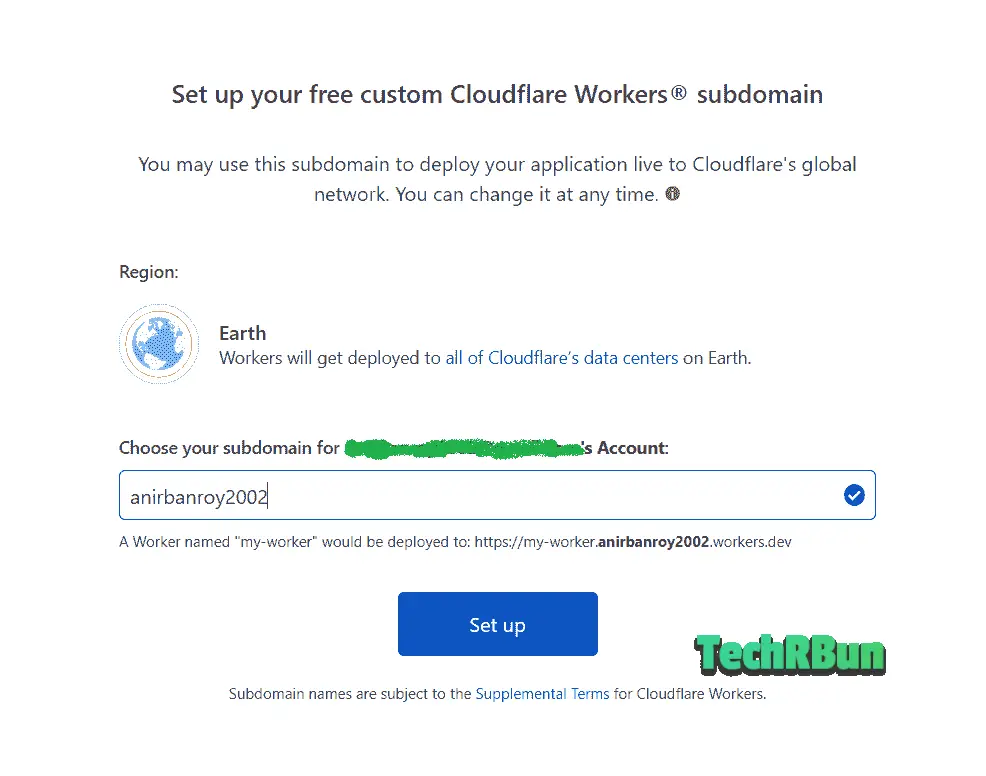
Click on Set up.
Continue with the free plan on the next step.
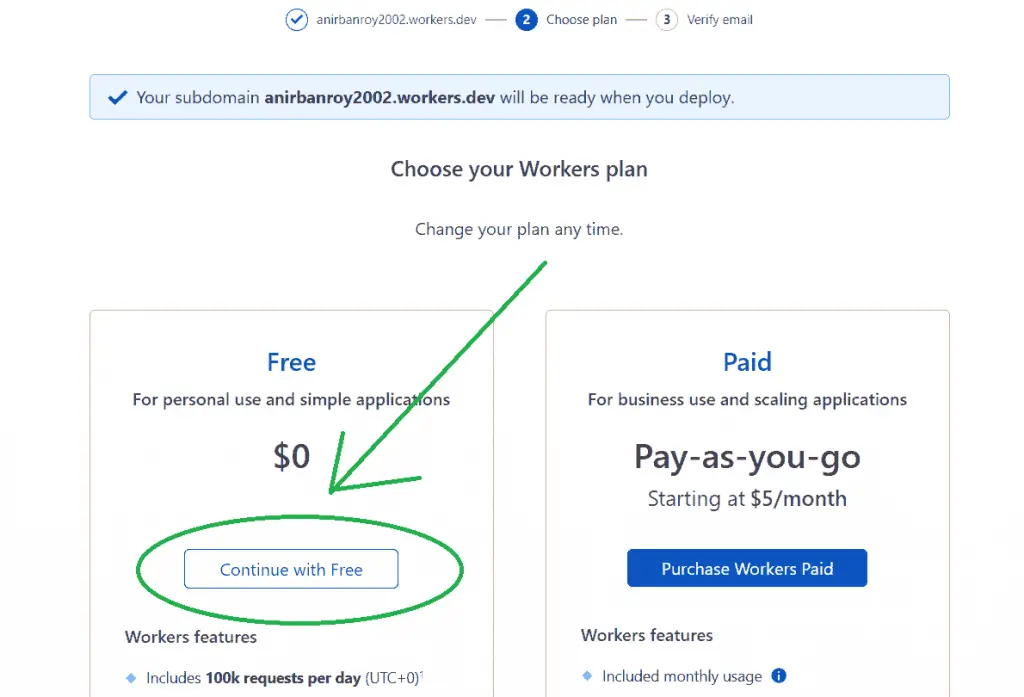
On the next page, click on Create a Worker.

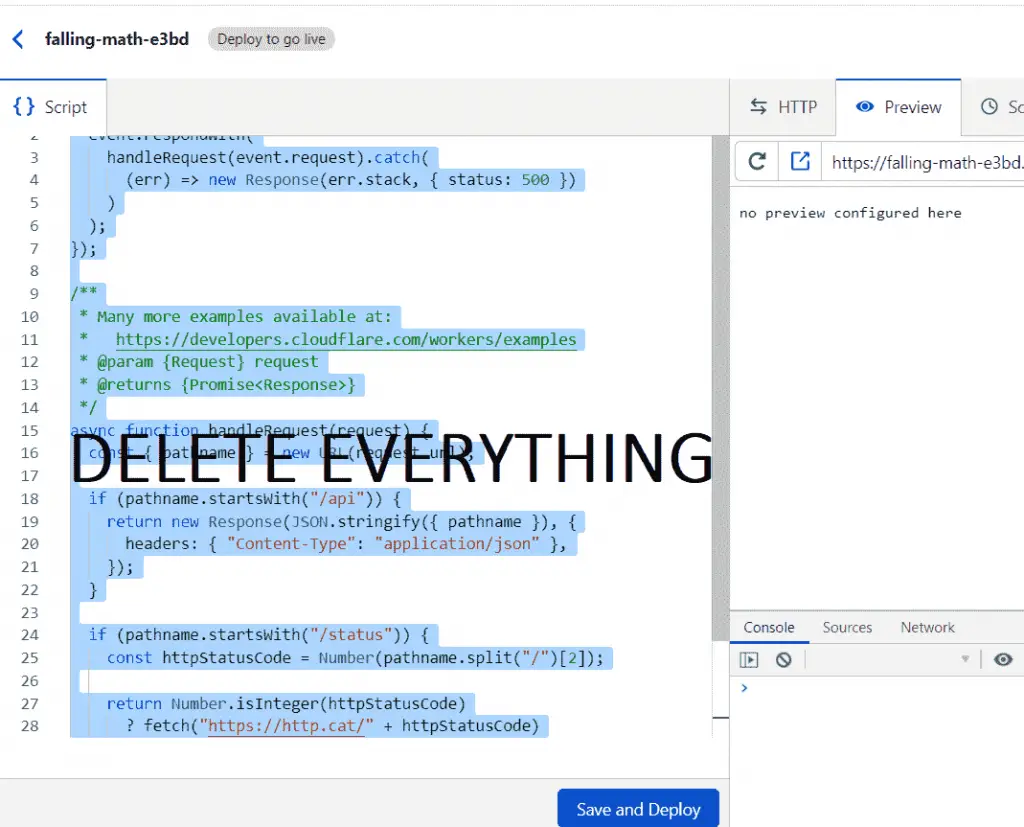
Once the Worker page is loaded, delete the existing script from the left hand side column.
Copy the code given below.
const js = `
'use strict';
const CACHE_VERSION=1;
let CURRENT_CACHES={offline:"offline-v1"};
const OFFLINE_URL="/p/offline-page-for-pwa.html";
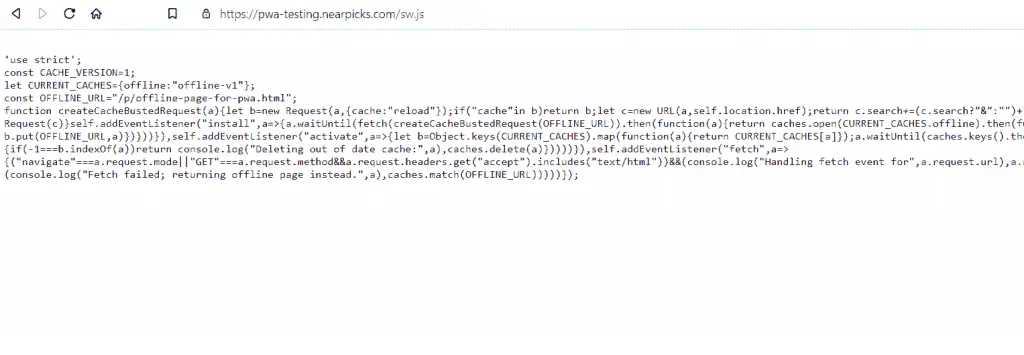
function createCacheBustedRequest(a){let b=new Request(a,{cache:"reload"});if("cache"in b)return b;let c=new URL(a,self.location.href);return c.search+=(c.search?"&":"")+"cachebust="+Date.now(),new Request(c)}self.addEventListener("install",a=>{a.waitUntil(fetch(createCacheBustedRequest(OFFLINE_URL)).then(function(a){return caches.open(CURRENT_CACHES.offline).then(function(b){return b.put(OFFLINE_URL,a)})}))}),self.addEventListener("activate",a=>{let b=Object.keys(CURRENT_CACHES).map(function(a){return CURRENT_CACHES[a]});a.waitUntil(caches.keys().then(a=>Promise.all(a.map(a=>{if(-1===b.indexOf(a))return console.log("Deleting out of date cache:",a),caches.delete(a)}))))}),self.addEventListener("fetch",a=>{("navigate"===a.request.mode||"GET"===a.request.method&&a.request.headers.get("accept").includes("text/html"))&&(console.log("Handling fetch event for",a.request.url),a.respondWith(fetch(a.request).catch(a=>(console.log("Fetch failed; returning offline page instead.",a),caches.match(OFFLINE_URL)))))});
`
async function handleRequest(request) {
return new Response(js, {
headers: {
"content-type": "application/javascript;charset=UTF-8",
},
})
}
addEventListener("fetch", event => {
return event.respondWith(handleRequest(event.request))
})In the fourth line of the above code, the OFFLINE_URL variable stores the URL of your offline page that you created in step 6.
If your Offline page URL is different from the one given in the code (i.e. /p/offline-page-for-pwa.html), then replace it with your actual offline page URL.
Now paste the code in your Worker Script column and click on Save And Deploy.
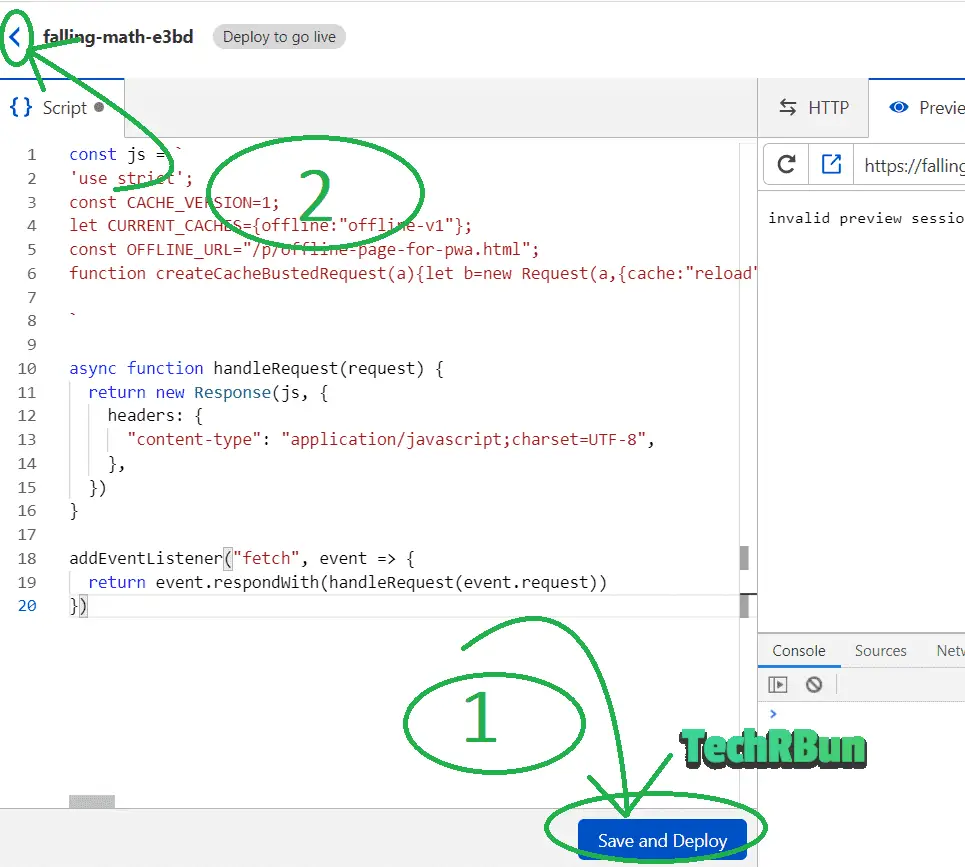
Once it’s saved, click on the arrow as shown in the screenshot to go back.
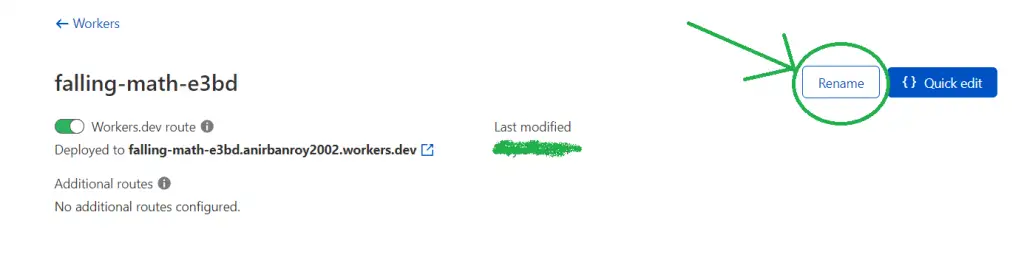
On the next page, click on Rename and change the worker’s name to “worker“.
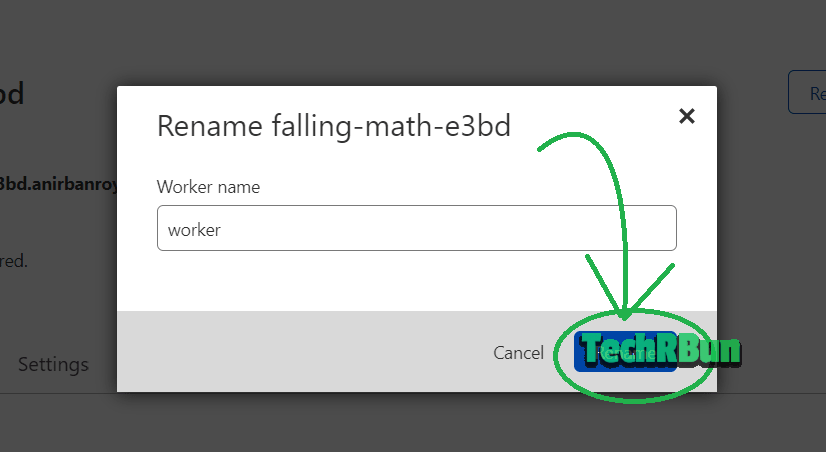
Once renamed, click on the Cloudflare logo to go back to the Cloudflare dashboard.
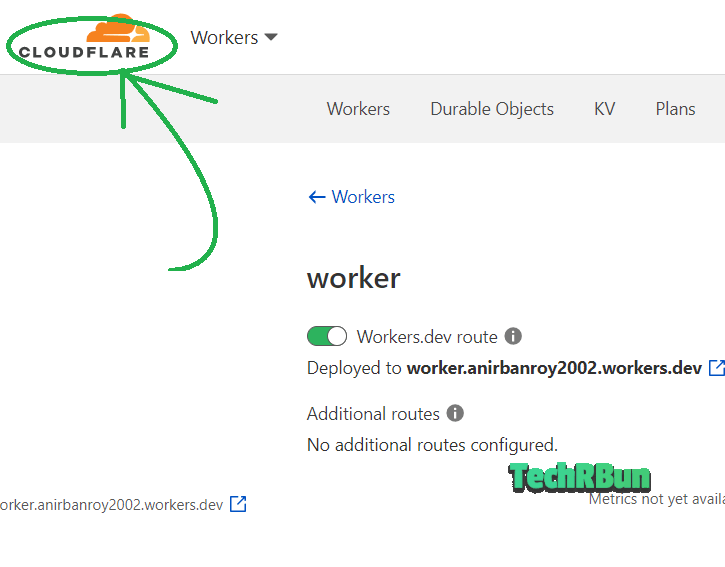
Select your Blog and click on Workers again.
On the next page, click on Add route.
Type www.yourblogaddress/sw.js (replace www.yourblogaddress with your actual blog address) under the Route field, and select the previously created worker under the Worker field.
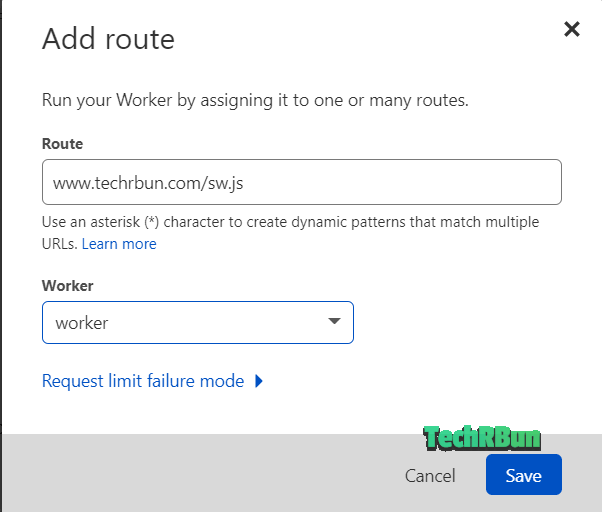
Click on Save.
Now test your service worker by going to www.yourblogaddress.com/sw.js. The service worker should be visible as shown below.
7. Add The Links And Scripts To Your Blog’s Source Code
Go to Blogger —> Theme —> Edit HTML.
Search for the </head> tag by pressing CTRL+F.
Just before the </head> tag, paste the following lines:
Don’t forget to replace the sample “href=” URLS with the actual URLs.
<link rel="apple-touch-icon" sizes="180x180" href="(REPLACE THIS WITH ORIGINAL Link to the 180 x 180 size picture)"/>
<link rel="icon" type="image/png" sizes="32x32" href="(REPLACE THIS WITH ORIGINAL Link to the 32 x 32 size picture)"/>
<link rel="icon" type="image/png" sizes="16x16" href="(REPLACE THIS WITH ORIGINAL Link to the 16 x 16 size picture)"/>
<link rel="manifest" href="(REPLACE THIS WITH ORIGINAL Link to the site.webmanifest)"/>
Now search for the </body> tag by pressing CTRL+F
Just before the </body> tag, paste the following lines:
<script type='text/javascript'>

if('serviceWorker' in navigator) {
  navigator.serviceWorker
           .register('/sw.js')
           .then(function() { console.log("Service Worker Registered"); });
}

</script>
Click on the Save theme button.
Done! Congratulations!
You’ve successfully made a Progressive Web App (PWA) for your Blogger blog.
Also Check Out: How To Change Favicon In The New Layout Of Blogger
Check it by visiting your website on your phone (using Chrome) and clicking on “Add to home screen“.
Don’t forget to share this article with other blogger friends of yours and on social media.
A lot of people believe that it is not possible to do this, but here I’ve just proved that it is absolutely possible and also showed you the easiest way to setup Progressive Web App for a Blogger blog.
Also check out: How to make Blogger Blog Full Width (100% Working Trick)
Do add TechRBun to your home screen or subscribe to our notifications/newsletter as I post awesome content on Blogging, Web Marketing and Technology.
Tired of slow indexing of your blog posts by Google? Check Out: How To Get Your Site Indexed By Google Instantly
I hope you liked this article. If you have any confusion, comment down below and I’ll surely help you out!
See you soon in the next post! Have a great day ahead!


Thank you so much. This method works like a charm ☺️
It helped me make a Progressive Web App for my blogger blog. This process is so easy to follow and quick to apply!
I’m glad!
Muito obrigado pela dica, embora suspeitasse que daria certo, mas seu post me ajudou a confirmar isso!!! Abraços…
Translation: Thanks so much for the tip, although I suspected it would work, but your post helped me confirm this !!! Hugs…
Reply : Estou tão feliz que você gostou deste post! ??. Muito obrigado pelo seu comentário.
Reply Translation : I’m so glad that you liked this post! ??. Thanks a lot for your comment.
You’re just amazing.
Thank you, Ashutosh! 🙂
Worked for me thanks a lot
You are most welcome!
It didn't work for me
Hi, could you please re-check if whether you followed all the above mentioned steps carefully or not? Because this method is 100% guaranteed to work. I am confident about that and I have also provided the proof for that. If you still have problems regarding this, kindly express the problem you are facing in details. You may also leave links to the screenshots of the problems here in the comment box. I will surely help you out. You can also hire me to set the Progressive Web App for your blogger blog, if you find it difficult / confusing. I will be more than happy to help ! ( :
If i have not custom domain …?
Without domain it is not possible…?
This process is not possible without a custom domain.
How did I get site.webmanifest??
Hi Faisal, you can generate the site.webmanifest file from favicon.io website, as I have already mentioned in the article. The site.webmanifest file would be included in the zip file that you download from favicon.io
Where to find site.webmainfest
Hi Husnain, you will get the site.webmanifest file inside the zip file that you download from favicon.io website.
Thanks brother it really helps
I’m glad.
on simply way, you can hosted the manifest.js with Github and then put link rel as on your html structure,
but i can’t find the best way for adding service-worker.js putting on directories at blogger, do u have any solutions?
Yes, hosting on Github is also a great option. Thanks for the recommendation, I will update it in the article.
And for the service-worker.js, till now I didn’t find any way of doing that. And the only practical problem that causes is that browsers won’t show the pop up of “Add to Home screen” and users will have to do it manually by clicking the three dot menu.
But there’s a solution for that as well, you can add pop up messages on your website triggered by user behaviour which can ask the visitor to install your Blogger PWA on their home screen.
How to register service worker?
Hi, right now there’s no way of including the serviceworker.js to the PWA of Blogger Blog. The problems caused due to this limitation, such as chrome not displaying the popup asking users to install the pwa of your blog, can easily be overcome by making a custom popup on your blog, asking your users to install your pwa. I will soon update this post with a thorough guide to do the same.
日本人です。
すばらしいですね!
この情報を基に作成してみます。
Translation: I am Japanese. That’s wonderful! Let’s create based on this information.
Reply: Thanks for your sweet comment ☺️
I’m glad that this post has helped you.
Translation: 素敵なコメントありがとうございます
この投稿があなたを助けてくれてうれしいです。
Hello. I recently learned about PWA. I found this feature very attractive and looked into implementing it on Blogger. This section introduces how to use DriveHQ. Are there other services? Should we support web hosting?
Hi there!
Yes, there are plenty of alternatives to DriveHQ, you can use any hosting service that you want.
Also, this article is soon going to be updated with plenty of new features including service worker, geo location, installation pop-up, etc. So, stay tuned for that.
If you are excited about those new updates, you can either subscribe to the push notifications of this website or you can DM me on Instagram @techrbuncom and I will let you know when I update this article with all the new exciting features. Thanks.
Thanks for your advice!
I will also try it on Blogger. If successful, can I introduce this feature too? Explain, of course, that you referred to this article.
Yes, you can do it. Just make sure you checkout the new features when they’re updated on this article. I’m sure everyone will love those advanced features.
Ask additional questions.
Should I copy the link address after uploading the icon in the draft?
Where do I get site.webmanifest?
Yes, you need to copy the link of those image icons. You will find the site.webmanifest file in the zip file itself. That you download from favicon.ico website. You will get multiple sizes of the same icon image. Upload all of them to the draft and copy their links and put them in the appropriate code as I have explained in the article.
You will find the site.webmanifest file in the zip file itself that you get from favicon.ico.
Upload the webmanifest to drivehq or any other hosting platform you like and do as explained in the article.
Thank you!
Ohh im looking forward to that!
I like the valuable information you provide in your articles. I’ll bookmark your weblog and check again here frequently. I am quite sure I will learn plenty of new stuff right here! Best of luck for the next!|
Thank you so much for your sweet words!?
Has this method recently made it impossible to implement PWA?
Even if I try it in my environment, “no matching service worker detected. You may need to reload the page …” is displayed.
Since serviceworker.js cannot be used with Blogger, I do not know why this error occurs.
Hi Kate!
On which browser/platform/service is the error message showing up?
It’s true that putting the service worker.js hasn’t been possible yet but the PWA is still working perfectly as intended. You can still add it to the home screen using the side menu and it will run smoothly with the interface on a standalone app.
After reading your comment, I re verified it on one of my client’s website that runs on Blogger and saw that it’s working perfectly like a standalone app. Ofcourse, you won’t get the auto pop-ups of chrome and local cache, but excluding that, everything else is working perfectly!
Thank you for your quick reply.
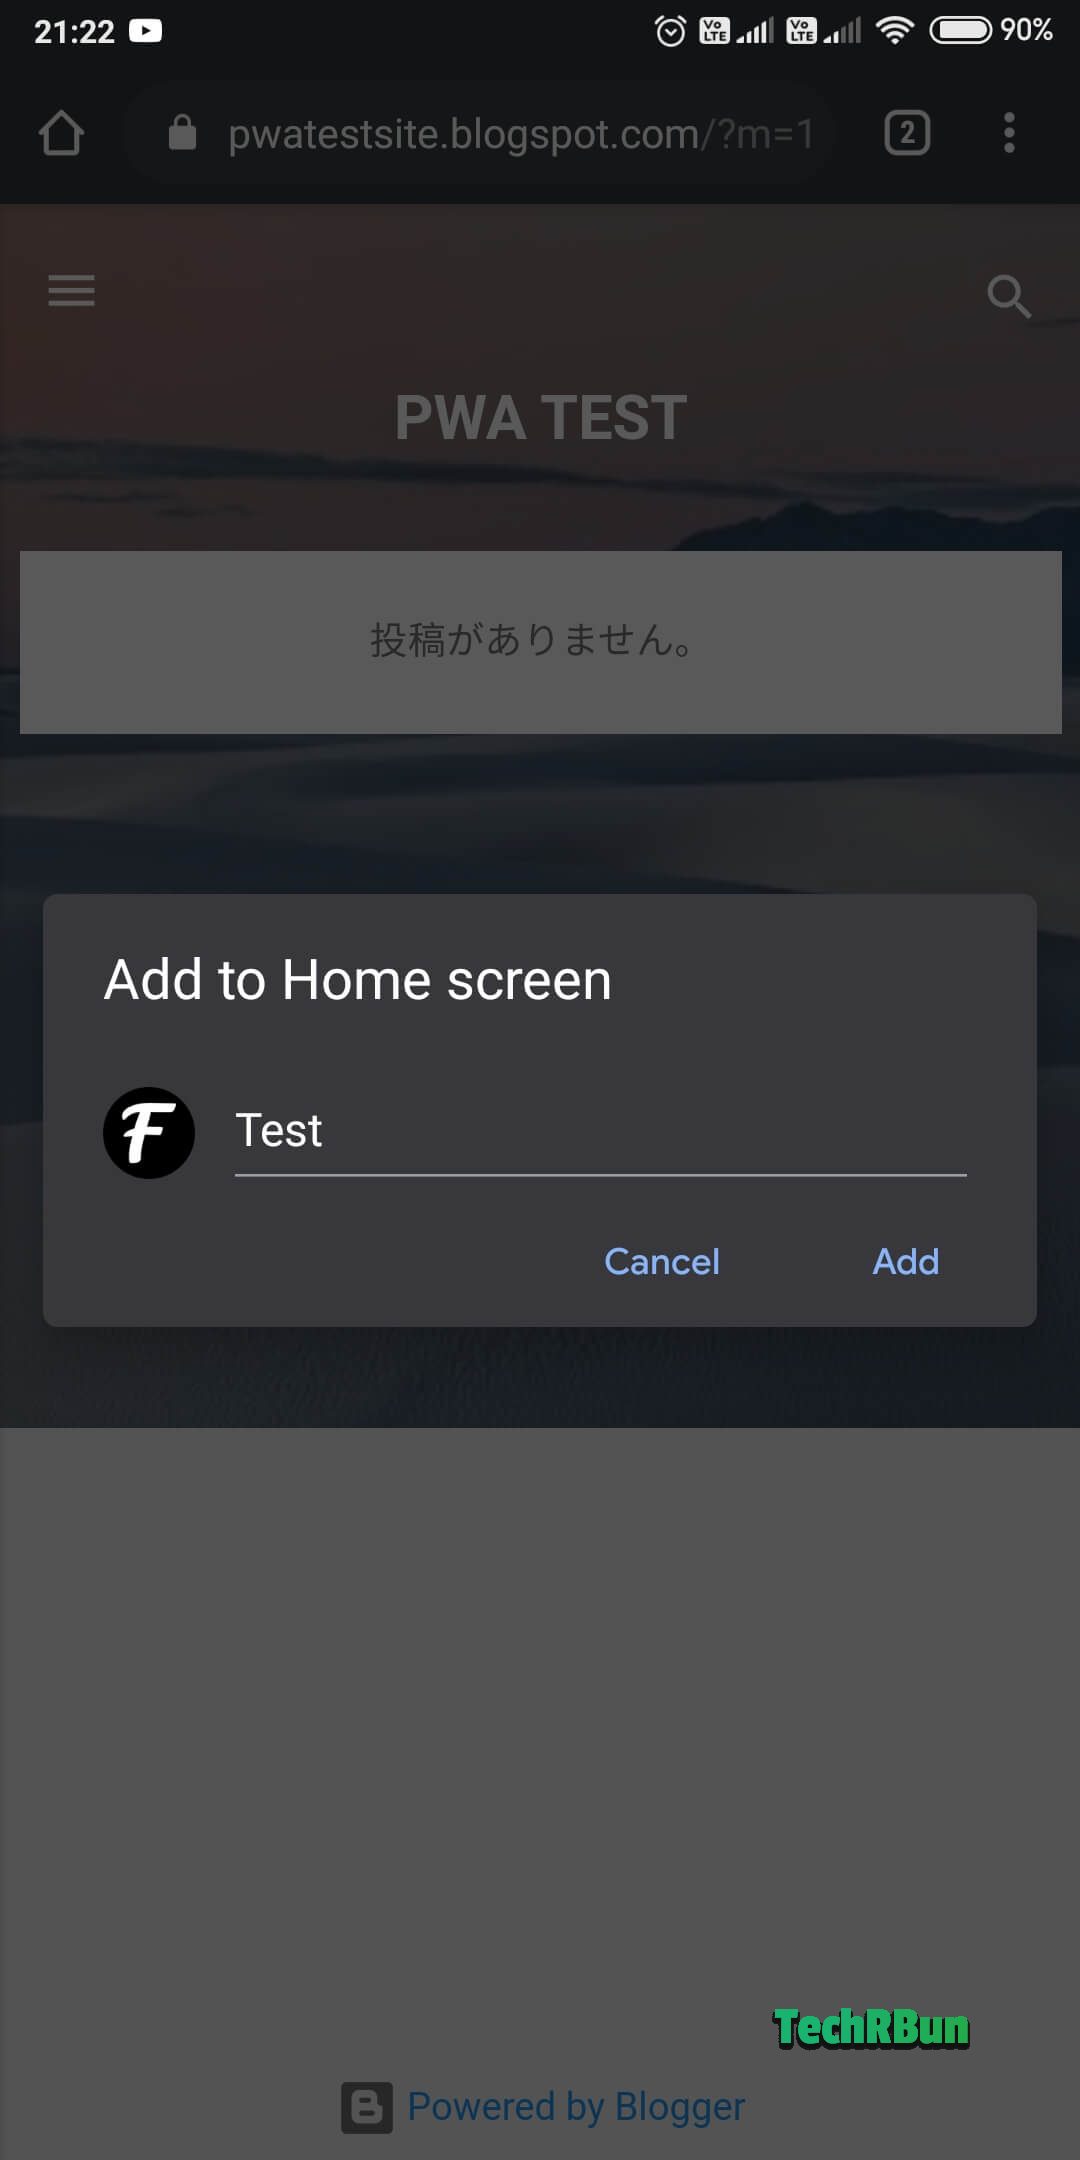
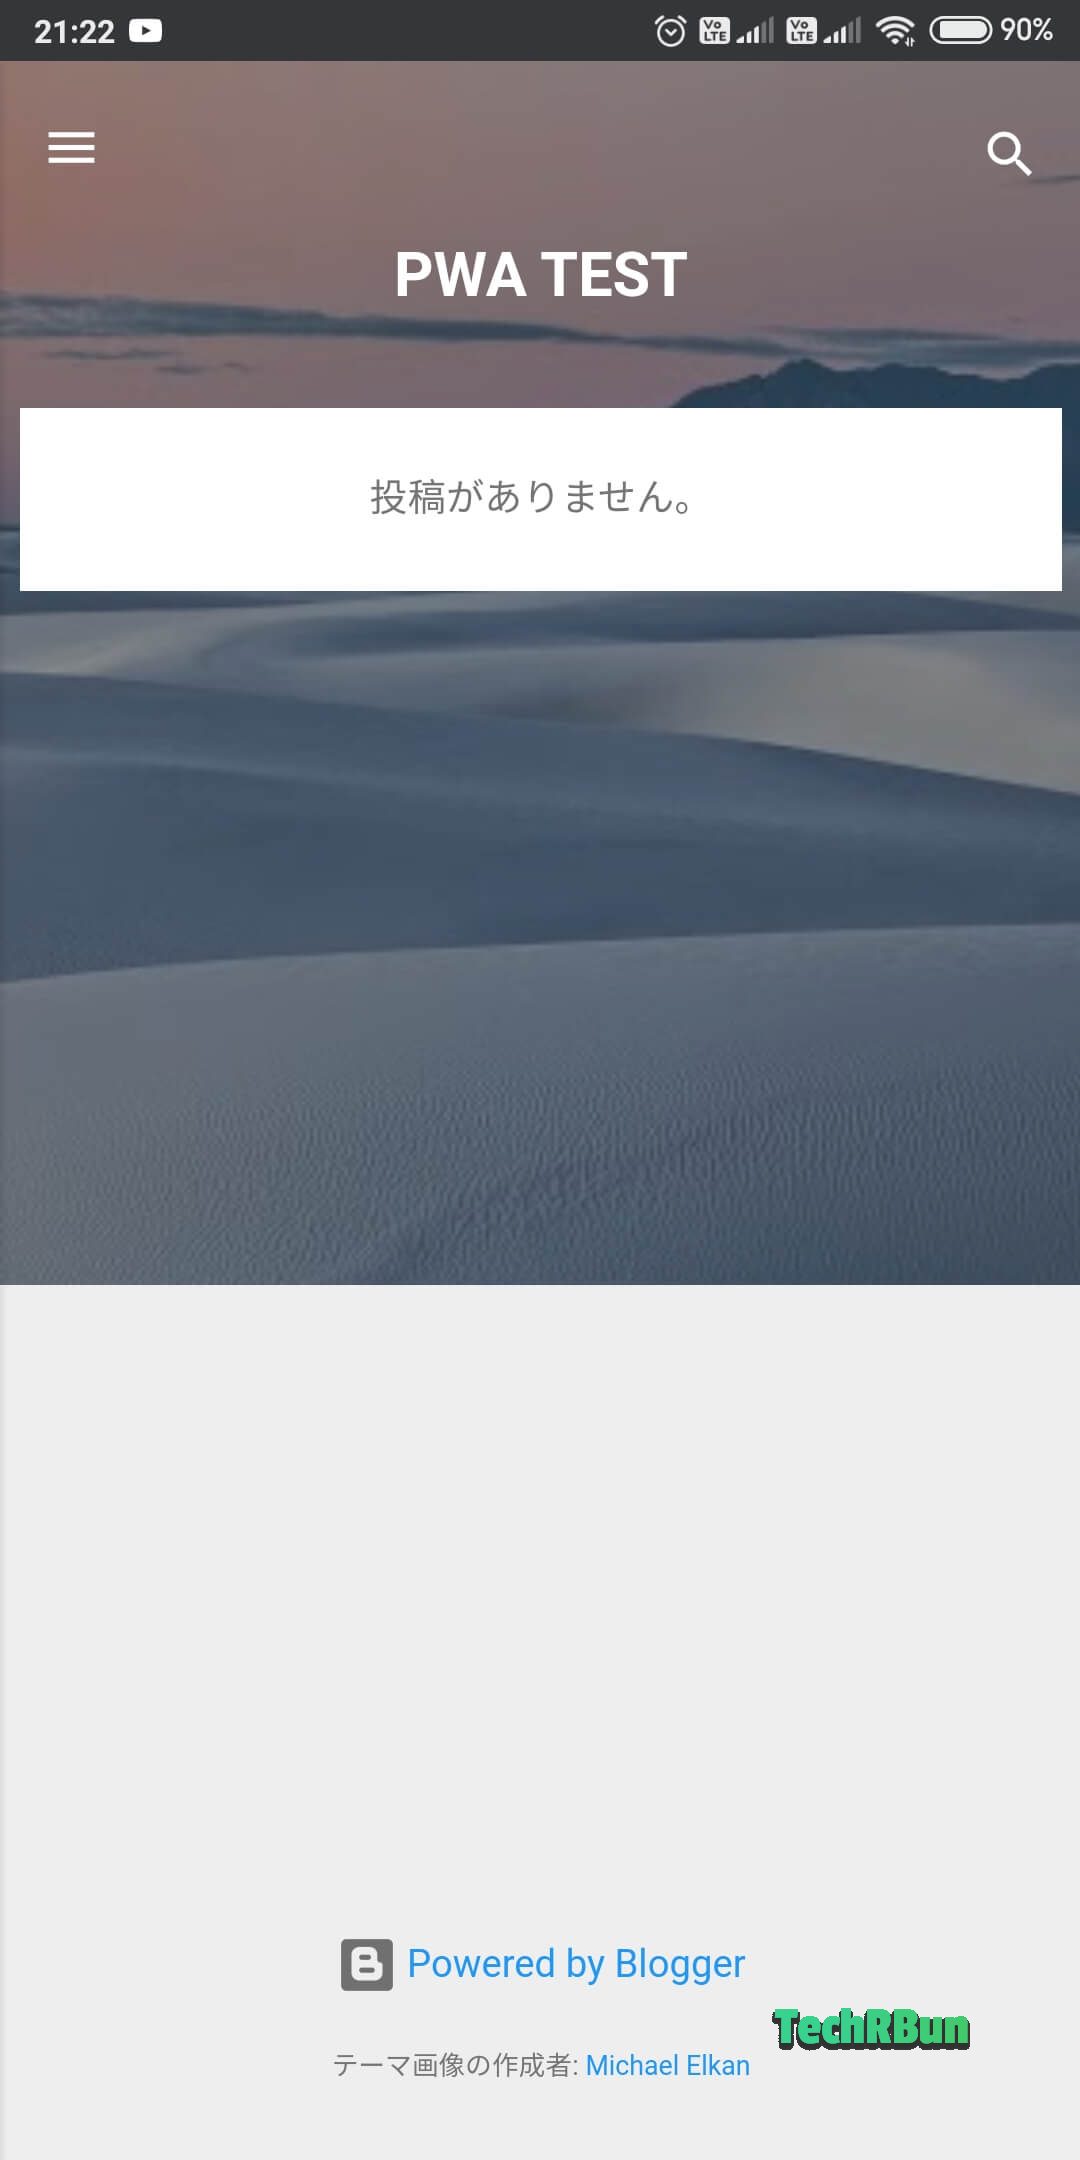
My Blogger site is below.
https://pwatestsite.blogspot.com/
“Site.webmanifest.json” is on Glitch’s online service.
“site.webmanifest.json” is running without any problem, so I do not know why it cannot be installed.
The web browser is Chrome.
The version is the latest 81.0.4044.92 (official build) (64 bit).
This won’t work on windows chrome due to the lack of serviceworker.js. However, it works perfectly fine on mobile phone as I have shown in the screenshot below.
I’ve checked your site. Also checked the code on your website. The PWA is working fine. Only the pop-up won’t work, as I already said, the way of making service worker.js work on blogger hasn’t yet been figured out.
So, you need to install the PWA by clicking on the “Add to home screen button”
I’m attaching the screenshots of your PWA as shown on my mobile phone (Android 9):
Add to home screen option
App On Android Homepage
Splash Screen
Launched Application
You are really amazing!
Thanks for testing everything!
You are really amazing!
Thanks for testing everything!
Please allow me to somehow show my gratitude next time.
I am Japanese. Once the coronavirus situation stabilizes, and if you come to Japan, we will introduce various tourist spots!
anyway , thank you very much.
I’m always happy to help!?
Would love to visit Japan! Love the culture there!
Bro you nailed it.
Thanks, Amruthan!
Bro one thing I wanna clear down as you posted the screen shots for explaning this to Kate, there is no chrome icon as subscript above the web icon. But when I add my website to home screen there is chrome icon subcripted above my web icon.
There won’t be any chrome icon, bro. I’m sure you have missed something and thus chrome icon is showing up in your case. Did you make and set the site.webmanifest exactly as I showed in Article?
Please share your screenshot. Upload your screenshot to imgur and comment the link to it here. I will check it and help you out!
Bro https://lifeofmechon.xyz is my website . I have tried as you say . I hosted the site.webmanifest in github . As I have tried you web to add to homescreen it saves like a charm . But When I try my web it asks me twice to add to homescreen and it can be done infine times but which is only one time permits in your case. So kindly check it and help me to sort out this issue.
Hi bro,
I tested your website. The pwa works great. I didn’t see the problem about the “chrome” icon that you mentioned in your previous comment by the way, can you please explain in more detail where is the chrome icon showing exactly?
And the other question of yours.. I have recently shifted to WordPress, where it is possible to use a service worker.js for the PWA and thus, I am getting the fully featured pwa experience and that’s the reason my PWA can only be installed once. But as I have already mentioned in the article, it’s not possible to add service worker.js in Blogger’s pwa because, it doesn’t allow you to put your own files on its root directory. So, due to the absence of service worker.js, the prompt doesn’t work and also, it allows you to add to your home screen as many times as you want.
But shouldn’t be an issue as you can easily code a small message on your site to notify users to install your pwa and also, why would someone install it twice purposely? That wouldn’t make sense. And even if someone does that, it’s GitHub’s server which will handle it, so no worries for you.
Thanks bro for the detailed explanation. I found a chrome badge over my icon,thats why I asked. Later I google about how to remove chrome badge,but nothing satisfied and I found this happens for above Oreo android.
It’s due to the RealMe UI of your phone bro, some custom roms do show the chrome icon.
But on my phone, which has MIUI rom, the chrome icon doesn’t show.
Thanks Bro
Can you help when try to save code in theme htmle in head section i got this error massage org.xml.sax.SAXParseException; lineNumber: 21; columnNumber: 13; Open quote is expected for attribute “rel” associated with an element type “link”.
Have you properly replaced the lines in red with the original link?
Please send me the screenshot of the code. Upload it to imgur and comment the link here.
I will check it and help you fix it.
Replace every “ and ” with “
Thank you for helping him out!!
Well, it is a good method but DriveHQ only lets one publish the file for 20 minutes. 🙁
I see. Then it must be a new rule of Drive Hq, as the limitation wasn’t there when I signed up.
Anyways, you can use GitHub to host your site.webmanifest file. Just upload your file to your repository and then click on raw to get the direct link.
Thank you for informing me about their new limitation. I will update the article with information about how to implement the same with GitHub.
I found a problem message in saving the template after editing
org.xml.sax.SAXParseException; lineNumber: 5; columnNumber: 13; Open quote is expected for attribute “rel” associated with an element type “link”.
Replace all the opening and closing quotes with the ” character. That will fix the problem.
it is not working. works just like normal add to homescreen. it has address bar. My blog —-> a2zee7.blogspot.com
Hi Siddhant,
DriveHQ has recently started putting a limit on free users. Thus you need to host the site.webmanifest file on GitHub. Please take a look at the screenshot below:
Thus, go to GitHub, create an account, make a new repository, upload the site.webmanifest file to it and click on “raw”. Copy the raw file’s url and put in in your Blogger header.
I haven’t been able to update it in the article due to time constraints, but will soon update the Article with the GitHub method.
thanks
I am getting an error
org.xml.sax.SAXParseException; lineNumber: 5; columnNumber: 15; Open quote is expected for attribute “rel” associated with an element type “link”.
Replace all the quotation marks with ” signs. The issue has been discussed in the previous comments.
Is this site made on blogger or wordpress. And if it’s made on blogger, how did you add the pop-up for adding web app on the homescreen. And even the notification toggle.
On my site, a2zee7.blogspot.com, the web app is working fine but I always need to visit the homepage to use it.
Hi Siddhant,
TechRBun was on Blogger at the time of writing this article, but now it runs on WordPress.
You cannot get the “Add to Homescreen” pop up on Blogger as it has been already explained in the article, Blogger doesn’t support adding service worker.
You can get the notifications popup using OneSignal. The detailed guide for that can be found here: How To Set Up Free Push Notifications For Blogger Blog (Easy Guide)
On my previous comment, I meant that if I add pwa from any article, a pwa for that article would be made. Also the pwa doesn’t show up in the app drawer
You need to add it from the homepage, not from individual articles. It won’t show up on the drawer. Only homescreen. This is because it lacks service worker.
With havin so much content and articles do you ever run into any problems of plagorism or copyright infringement? My website has a lot of exclusive content I’ve either created myself or outsourced but it seems a lot of it is popping it up all over the web without my agreement. Do you know any techniques to help prevent content from being stolen? I’d definitely appreciate it.
Hi Adrianna, I had recently faced an issue where another website had copied one of my articles. I had found it out using copyscape. I had reported that issue to the Google DMCA team and they had taken in down from their search and also as it was hosted on Blogger, which is a CMS owned by Google, they completely deleted that copied article and on my behalf, submitted my application to the Lumendatabase.
You can access the Google DMCA support page using this link: https://support.google.com/legal/troubleshooter/1114905?hl=en
Thank you so much for this tutorial!
I have one issue. When I right click on the extracted site.webmanifest file there is no option to edit. I’m on a windows 10 machine. I’m going to try the windows 7 machine now. Is there any way around this?
I’m excited to see your updates to this article!
I’m also trying to figure out push notifications. Do you have a tutorial on this?
Thank you so much for sharing your talents with the rest of us. 😊
Woooo hooo I got it working by editing the file in GitHub then adding the URLs from there. Thank you!
Nice! 🙂
Hi Kevin!
If the edit option doesn’t show up on right clicking the file, simply open the file with Notepad from the properties.
Here’s the tutorial to enable free push notifications on Blogger.
Yes, I did figure that out as well. It is also possible to host the favicon images on GitHub by uploading them into the repository. Thats what I did and it works great. Infact I’m using GitHub to host all of my layout svg images now.
Im about to use this same process on my forum. Couldn’t thank you enough, I’m excited!
And if you’ll excuse me, I need to install push notifications now.
Thank you so much!😁
No. That would require FTP access to upload the service-worker.js file. Blogger doesn’t give you FTP access.
Do you think Chrome will support the installation of serviceWorker.js in the very near future ? (Thank you).
Chrome already supports it. Blogger doesn’t allow you to host it. There’s no news about whether or not Blogger will let you host your own files in the future or not.
I want to make publish my pwa blogger website to google play store using twa (trusted web activity); as of now i am using webview to do that. Is it possible to make blogger pwa to apk using twa and then publishing it to play store?
No, you need to keep using webview for that purpose.
Hey bro tutorial is awesome i have applied all settings but icon is working fine but landing page is not working its adding only web page on home screen please check & tell me
My site :- www.wpnoobs.in
Hi Vishwajeet!
Your PWA is not working because your site.webmanifest file is invalid. The APP names doesn’t match with the site’s name (which isn’t an issue though) but the main problem is, all the icons mentioned in the manifest file point to relative URLs, which are invalid if you try to access them from other domain. So, you need to use ABSOLUTE URLs in the web.manifest file, as I have shown in the article.
why is my comment still waiting for moderation?
Hi Adi, thank you so much for commenting again. When a comment contains a hyperlink, it automatically lands into the spam section and is auto deleted within 24hrs unless marked “not spam” by the admin. When I saw your comment, I straight away went to your article and started reading it and later forgot to approve the comment.
To correct my mistake, I mentioned you in the article itself along with a link to your blog, under the “Steps to make progressive web app for blogger” heading.
Isn’t an in-article link much better than a comment backlink? 😉
on the website there is a tutorial to change the blogger image domain into your own domain using cloudflare. with cloudflare worker I also tried to customize the domain of my blogger website with a subdirectory of the main domain which is actually not allowed by blogger
Yes I saw that too. But it’s not needed. The image mentioned in the site.webmanifest, can be hosted on a different domain. And I prefer Blogger’s own image hosting.
or there is one more trick that can be used by using workers on blogger, which is to change the permalink of the previous blogger like this /p/ to be like /page/ and /search/label/ to /category/. you can see an example on the marwanto606 website
I know. But that’s not recommended as the free version only allows a limited number of requests and thus, if you exceed your quota, those pages won’t be available anymore which would be disastrous both for SEO, and user experience.
Workers should only be used when there’s no other way around.
I also still have problems getting the blogger operator url pathname which they don’t provide for testing the custom subdirectory on my blogger website
which I am aware of. just a test for now. if it is possible maybe i need to upgrade
Sorry, I mistyped the comment just now. I use google translate to translate to english
actually it’s not my website but someone else’s website that I’m sharing, I’ve implemented it on my own blogger website like the tutorial I shared.
Opps! Then I must mention the correct website owner in the article.
you can change the name to marwanto606
I did that.
where to use of the url of Raw site.webmanifest file for you PWA.
you should link that in the <head> section of your HTML source, as shown in step 7
I did .But Not working
I’ll be happy to take a look if you could share your url.
Translated from Arabic, you are really a great creator. Anirban Roy. Please, I do not understand anything at all in programming. I searched a lot in Arabic content and did not find anything. I hope you can help me by giving you a link to my blog and emails, and adding you in my blog to activate PWA. Please help me. Thank you
I am waiting for your reply and I hope you can help me
Hi Ahmed, you pretty much just need to copy paste and edit some portions of the code as instructed in the article. I am currently not available for hire. However, I will be happy to guide you if you could share the steps in which you’re facing problem or the code snippets you’re unable to edit.
It’s not working. I have followed your instruction step by step. Uploaded site.manifest file in github and server worker in cloudfare. But it’s not working. Lots of error coming on Google chrome lighthouse test in PWA section.
Website – https://www.shabdodweep.co.in
This one is website. Please help to solve the issues.
Lighthouse shows multiple errors in your manifest. The most important of them being, no maskable icon found. You need to add “purpose”: “any maskable” to your icons. Make that change and update me here in the comments.
My blogspot site address is https://www.shabdodweep.co.in — I have followed everything that you have shown in your article. But when I test the PWA in Google Chrome Lighthouse tool then I get multiple errors and PWA score is zero. Those errors are given below:-
(1) Web app manifest or service worker do not meet the installability requirements 1 reason
(2) Does not register a service worker that controls page and start_url
For Maskable icon – “purpose”: “any maskable” is written in manifest.json … Theme colour is written in meta tag but it’s not taking.
Please help me to solve these issues.
Kindly refer to my previous reply to your comment. You need specify the icons as maskable.
Hi Anirban ,
It working man !!! Finally completely functional PWA for Blogger. Great work.
Awesome!
My website address – https://www.shabdodweep.co.in
(1) “purpose”: “any maskable” => this line is present in site.webmanifest but no image is showing when going to Add in Home Screen
(2) “www..shabdodweep.co.in/sw.js” => this url is taking the page to website home url but not showing the cloudflare worker’s code
(3) ‘https://worker.shabdodweep.workers.dev” => this url is showing the cloudflare worker’s code
Please help me to solve the issues I am getting in my website
As per your instruction I have done every thing.
My website address – https://www.shabdodweep.co.in
(1) “purpose”: “any maskable” => this line is present in site.webmanifest but no image is showing when going to Add in Home Screen
(2) “www..shabdodweep.co.in/sw.js” => this url is taking the page to website home url but not showing the cloudflare worker’s code
(3) ‘https://worker.shabdodweep.workers.dev” => this url is showing the cloudflare worker’s code
Please help me to solve the issues I am getting in my website
There seems to be a misconfiguration in your Cloudflare worker. Please share a screenshot of it so that I can check and see what’s wrong. You may simply leave a link to your screenshot in the comment. Do not use any html tag in your comment, as then it might get filtered as spam.
Screenshot of cloudflare worker settings are attached in the below links. Please check and help me to solve the issue.
https://drive.google.com/file/d/11NjX3EBoQrTlnpr8xIP9ESbBWb_atqeA/view?usp=sharing
https://drive.google.com/file/d/1BgvN64gHeIOM-E7uD_7G0nd9hsFOxXEx/view?usp=sharing
https://drive.google.com/file/d/1Vihaxc-HyXOW5AMzyJY8SEWdg55xvyUs/view?usp=sharing
Waiting for you response.
The configuration here seems fine. Please share the screenshot of the worker script.
As per your response got on 14th November, 2021 – I am sending you the screenshots of worker script in cloudflare. Drive links are given below.
https://drive.google.com/file/d/1fKGjtdeTmsy3YImcrQajK-ICkXZ_RAMo/view?usp=sharing
https://drive.google.com/file/d/1U36izdlo_JkPdqo2_9TNVQ7N02tFTfxV/view?usp=sharing
Please check.
Waiting for your response.
This is strange indeed. I would need to log in to your cloudflare and blogger admin to check on this further. You may e-mail me regarding this.
Hello, my website (www.edge.com.uy) has a /?m=1 ending when visited from a mobile browser. Because of this, the PWA appears to install but as a simple shortcut. I’ve seen that in computer browsers and in desktop versions of my website, the option does appear as normal. Any solution? Thanks!
Não consegui realizar todos os passos. No site Cloudflare aparece o erro: cooperadoresdoevangelho.blogspot.com is not a registered domain… preciso saber se dá pra fazer isso com um domínio blogspot.com ou preciso comprar um domínio personalizado.
You need a custom domain to make it work. Blogger’s subdomain won’t work.