Welcome to this extensive troubleshooting guide for resolving the frustrating issue of your Roomba refusing to go home and dock to charge.
As an experienced Roomba user who has encountered this problem, I understand the frustration it can cause.
In this detailed article, I will guide you through a comprehensive step-by-step process to troubleshoot and fix this issue.
![[Fix] Roomba Takes Forever To Go Home, Won’t Dock To Charge](https://www.techrbun.com/wp-content/uploads/2023/06/roomba.png)
By the end, you’ll have the knowledge and confidence to get your Roomba back on track.
So, let’s dive into the guide and ensure your Roomba goes home and docks to charge flawlessly!
Table of Contents
- 1 Steps To Fix Roomba Not Returning To Home Dock For Charging
- 1.1 Section 1: Check The Home Docking Station
- 1.2 Section 2: Clearing The Docking Area
- 1.3 Section 3: Cleaning the Roomba’s Charging Contacts
- 1.4 Section 4: Resetting the Roomba
- 1.5 Section 6: Rebooting the Docking Station
- 1.6 Section 7: Updating Roomba’s Software
- 1.7 Section 8: Contacting Roomba Support
Steps To Fix Roomba Not Returning To Home Dock For Charging
Section 1: Check The Home Docking Station
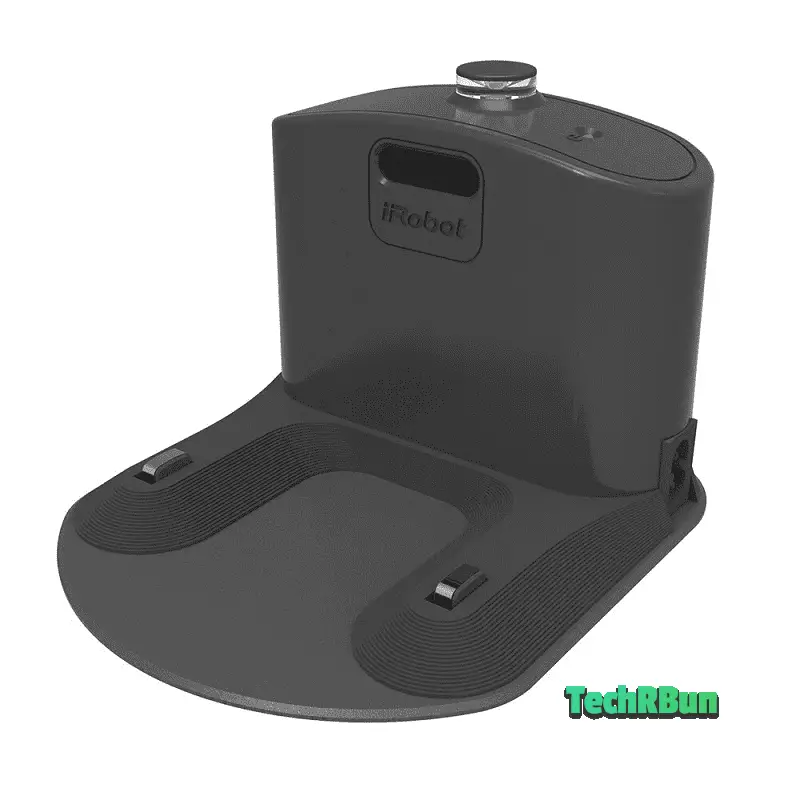
If you are experiencing difficulties with your Roomba not returning to the home dock for charging, checking the docking station should be your first course of action.
Verify the power connection, ensuring that the power outlet and cable are functioning properly. Pay attention to the placement of the docking station, aiming for an accessible and obstacle-free location.
Lastly, inspect the docking station for physical damage and clean it to enhance contact with the Roomba.
1.1 Power Connection
The first step in resolving the docking issue is to check the power connection. A loose or damaged power cable could be preventing your Roomba from docking properly.
Start by inspecting the power outlet and ensure it is functioning correctly. Try plugging in another device to confirm that the outlet is supplying power. If the outlet is working fine, move on to examining the cable connection.
Ensure that the power cable is securely connected to both the docking station and the power outlet. If you find any loose connections, firmly reconnect them.
If the power cable is damaged, consider replacing it with a compatible one. Faulty power connections can disrupt the charging process and prevent the Roomba from docking successfully.
1.2 Docking Station Placement
The placement of the docking station can greatly affect the Roomba’s ability to find and dock with it.
To optimize performance, ensure that the docking station is positioned in an ideal location. Place it in an open area, away from obstacles and furniture that might hinder the Roomba’s path.
Keep in mind that the docking station should be easily accessible to the Roomba, without any obstructions in its way. This allows the robot vacuum to navigate back to the dock effortlessly after completing its cleaning cycle.
Additionally, consider the distance between the docking station and the area where the Roomba operates most frequently. Placing the docking station closer to the center of the cleaning area can improve the chances of successful docking.
1.3 Docking Station Inspection
Regular inspection of the docking station is essential for maintaining its functionality.
Start by examining the docking station for any physical damage. Look for cracks, dents, or other signs of wear that could interfere with the Roomba’s docking process.
If you discover any damage, it may be necessary to replace the docking station to ensure proper functionality.
Next, check for any debris or dirt that may have accumulated on the docking station. Over time, dust and debris can accumulate and hinder the contact between the Roomba’s charging contacts and the docking station’s charging points.
Gently clean the docking station using a soft cloth or brush to remove any dirt or debris. This will help establish a strong connection between the Roomba and the docking station, allowing for successful docking and charging.
Section 2: Clearing The Docking Area
Creating a clear docking area is crucial for ensuring that your Roomba returns to its home dock for charging without any hiccups.
Start by identifying and removing any obstacles in the Roomba’s path, such as furniture, wires, or clutter. Address any challenges posed by carpets and rugs by securing loose edges and ensuring they lie flat on the floor.
Finally, manage your curtains and drapes to avoid any obstructions that could hinder the Roomba’s movement. By implementing these simple steps, you’ll create a clean and obstacle-free path for your Roomba, allowing it to dock successfully and recharge for its next cleaning session.
2.1 Clearing Obstacles
The first step in creating a clear docking path for your Roomba is to identify potential obstacles.
Take a moment to survey the area around the docking station. Are there any pieces of furniture, wires, or clutter that might obstruct the Roomba’s path?
If so, it’s time to clear them out! Move any furniture that could block the Roomba’s access to the docking station.
Ensure that there are no wires or cords in the way, as they can tangle with the Roomba or impede its docking process.
Clearing the docking area of any obstructions will make it easier for the Roomba to navigate and find its way back home.
2.2 Addressing Carpets and Rugs
Carpets and rugs can sometimes pose a challenge for the Roomba when it comes to docking. Loose carpet edges or thick rugs might interfere with the robot vacuum’s ability to dock properly.
To address this, consider securing loose carpet edges with double-sided tape or rug grippers. These simple solutions can help keep the edges in place and prevent them from obstructing the Roomba’s path.
If you have a particularly thick rug, make sure it lies flat on the floor to avoid any elevation differences that could interfere with docking. By ensuring a firm grip on the floor, you provide a smooth and obstacle-free path for the Roomba to return to its dock.
2.3 Managing Curtains and Drapes
Curtains and drapes can sometimes be the culprits behind a Roomba’s docking issues. If your curtains are hanging too low and obstructing the Roomba’s path, it’s time to make some adjustments.
Ensure that the curtains are properly adjusted to a height that allows the Roomba to navigate freely without getting entangled. If you have curtain tiebacks or hooks, check if they are positioned correctly and not impeding the Roomba’s movement.
Adjusting the position of the tiebacks or hooks can make a significant difference in creating a clear path for the Roomba to dock. By managing your curtains and drapes effectively, you eliminate potential obstacles that might hinder the Roomba’s docking process.
Section 3: Cleaning the Roomba’s Charging Contacts
Keeping the charging contacts of your Roomba clean is essential for ensuring efficient docking and uninterrupted charging.
Over time, dirt and debris can accumulate on the charging contacts, leading to poor performance and difficulties in returning to the home dock.
In this section, we’ll explore the importance of clean charging contacts and provide step-by-step instructions on how to clean them effectively.
3.1 Importance of Clean Charging Contacts
To understand the significance of maintaining clean charging contacts, it’s important to recognize how dirt and debris can affect their performance.
The charging contacts on the Roomba serve as the connection points between the robot vacuum and the docking station.
When dirt, dust, or other contaminants accumulate on these contacts, they can interfere with the flow of power, resulting in inefficient charging or even preventing the Roomba from docking altogether.
By keeping the charging contacts clean, you ensure a reliable and efficient charging process, allowing your Roomba to perform at its best.
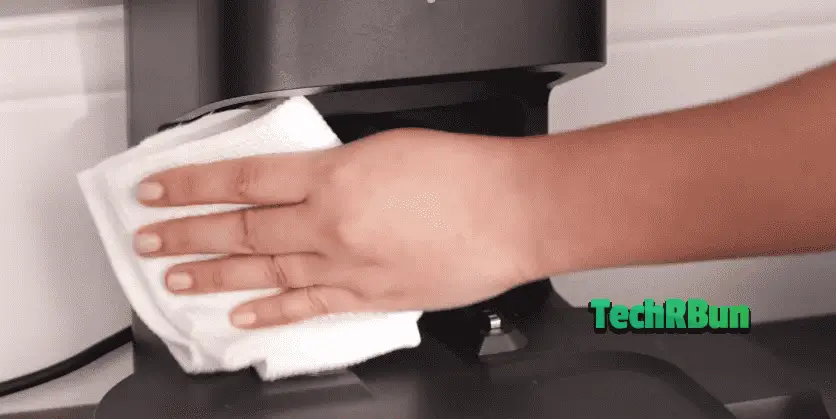
3.2 Cleaning the Roomba’s Charging Contacts
Now let’s get into the nitty-gritty of cleaning the charging contacts on your Roomba.
Follow these step-by-step instructions to maintain clean and well-functioning contacts:
Step 1: Power off and unplug the Roomba
Before you begin the cleaning process, make sure your Roomba is powered off and disconnected from the docking station to avoid any accidents.
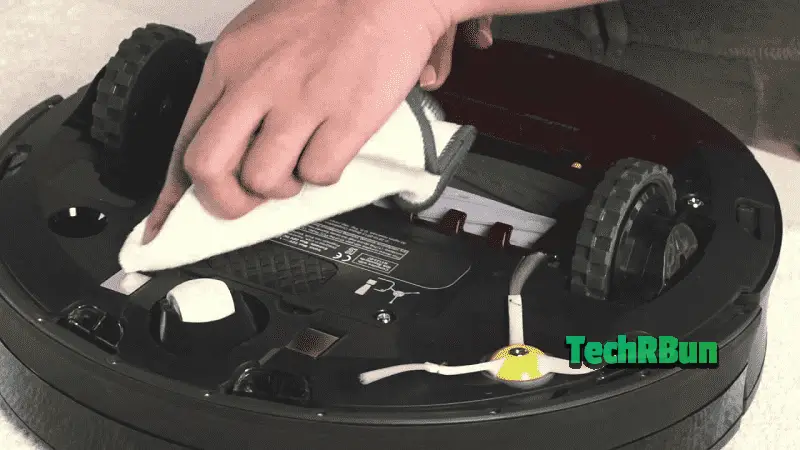
Step 2: Locate the charging contacts
Take a close look at the bottom of your Roomba. You will find the charging contacts—usually a set of metal plates—on the underside of the robot vacuum. These are the points that make contact with the docking station.
Step 3: Prepare cleaning tools
Gather the necessary tools for cleaning the charging contacts. You will need a soft, lint-free cloth or microfiber cloth and some isopropyl alcohol or contact cleaner. Ensure that the cloth is clean and free from any abrasive particles that could scratch the contacts.
Step 4: Dampen the cloth
Lightly dampen the cloth with isopropyl alcohol or contact cleaner. Be cautious not to saturate the cloth excessively; a small amount is sufficient.
Step 5: Gently clean the charging contacts
Using the damp cloth, gently wipe the charging contacts on the Roomba. Apply slight pressure to remove any dirt, grime, or residue that may have accumulated. Be thorough but gentle to avoid damaging the contacts.
Step 6: Inspect and repeat if necessary
After cleaning, inspect the charging contacts to ensure they are free from debris. If you notice any remaining dirt or buildup, repeat the cleaning process until the contacts are clean.
Step 7: Allow the contacts to dry
Once you are satisfied with the cleanliness of the charging contacts, allow them to air dry completely before reconnecting your Roomba to the docking station.
Remember, it’s crucial to avoid using water or excessive moisture during the cleaning process, as it can damage the internal components of your Roomba. Stick to using isopropyl alcohol or contact cleaner, as they evaporate quickly and leave no residue.
By following these steps and periodically cleaning the charging contacts, you can maintain optimal performance and ensure seamless docking and charging for your Roomba.
Clean charging contacts are vital for the efficient operation of your Roomba. By understanding the importance of clean contacts and following the step-by-step instructions provided, you can keep your Roomba’s charging contacts in pristine condition.
Regularly cleaning these contacts will ensure uninterrupted charging, allowing your Roomba to function at its best and keep your floors clean and tidy.
Section 4: Resetting the Roomba
Sometimes, when your Roomba is not returning to the home dock for charging, a simple reset can do the trick. Resetting the Roomba helps to resolve various issues, including docking problems.
In this section, we’ll explore the purpose of resetting, differentiate it from restarting, and provide a step-by-step guide on how to perform a reset effectively.
4.1 Purpose of Resetting
Resetting your Roomba can be an effective troubleshooting method to address docking issues. It allows the robot vacuum to recalibrate its internal systems and refresh its programming, potentially resolving any software glitches or configuration errors that might be causing the problem.
Resetting the Roomba is different from simply restarting it. While a restart turns the Roomba off and on again, a reset involves a more comprehensive process that involves restoring the Roomba to its default settings, similar to a factory reset.
4.2 Performing a Reset
Follow these step-by-step instructions to perform a reset on your Roomba:
Step 1: Locate the reset button
On most Roomba models, the reset button is found on the underside or the back of the device. Look for a small, recessed button that can be pressed using a paperclip or a similar tool.
Step 2: Power off the Roomba
Ensure that your Roomba is turned off. If it’s currently docked, remove it from the docking station.
Step 3: Press and hold the reset button
Using a paperclip or a similar tool, press and hold the reset button for about 10 to 15 seconds. You may need to exert a bit of pressure to activate the reset function.
Step 4: Release the reset button
After holding the reset button for the specified duration, release it. You may notice that the Roomba’s indicators or lights blink or change momentarily. This indicates that the reset process has been initiated.
Step 5: Allow the reset to complete
Give your Roomba a few moments to complete the reset process. During this time, avoid pressing any other buttons or interrupting the reset sequence.
Step 6: Power on the Roomba
Once the reset process is complete, turn your Roomba back on by pressing the power button. The Roomba should now be restored to its default settings.
Performing a successful reset can help resolve various issues, including docking problems. However, it’s important to note that a reset should be considered a troubleshooting step and not a guaranteed solution. If the docking issue persists even after resetting, it may be necessary to explore other potential causes described in this article.
Section 6: Rebooting the Docking Station
If your Roomba is still not returning to the home dock for charging, it’s time to consider rebooting the docking station itself.
Rebooting the docking station can help resolve docking issues by refreshing its internal software and settings.
In this section, we’ll explore why rebooting the docking station is beneficial, explain the process and purpose of rebooting, and provide step-by-step instructions on how to perform a reboot effectively.
6.1 Rebooting for Troubleshooting
Rebooting the docking station is a troubleshooting technique that can address various docking issues. Over time, the docking station’s software may encounter glitches or errors that can hinder proper communication with the Roomba.
By rebooting the docking station, you essentially give it a fresh start, allowing it to clear any temporary issues and establish a stable connection with the Roomba.
6.2 Rebooting the Docking Station
Follow these step-by-step instructions to reboot your docking station:
Step 1: Locate the power source
Identify the power source that supplies electricity to the docking station. It could be a power outlet or a power strip. Ensure that the power source is easily accessible.
Step 2: Disconnect the power
Gently unplug the power adapter from the power source. Make sure to pull the plug directly from the outlet or power strip and not from the cord itself.
Step 3: Wait for a few minutes
Allow the docking station to remain disconnected from the power source for approximately 2-3 minutes. This waiting period allows any residual power to dissipate and ensures a complete reboot.
Step 4: Reconnect the power
After the waiting period, plug the power adapter back into the power source. Ensure that the connection is secure.
Step 5: Verify power and functionality
Check if the docking station’s power indicator lights up, indicating that it has received power. If the docking station has any additional status indicators, observe their behavior to ensure that the reboot is successful.
Step 6: Test docking functionality
Place your Roomba near the docking station and initiate the docking process. Observe if the Roomba successfully docks and begins charging. If the docking issue has been resolved, you have successfully rebooted the docking station.
Rebooting the docking station is a simple yet effective troubleshooting step that can often resolve docking issues. However, it’s important to note that if the problem persists even after rebooting, there might be underlying hardware or connectivity issues.
Section 7: Updating Roomba’s Software
Regular software updates play a crucial role in maintaining the optimal performance of your Roomba, including its docking behavior.
Outdated software can impact the Roomba’s ability to communicate with the docking station and may result in docking issues.
In this section, we’ll explore the importance of software updates, guide you through the process of connecting your Roomba to Wi-Fi for updates, provide instructions for checking and updating the software, and offer precautions and recommendations to ensure a smooth update process.
7.1 Importance of Software Updates
Outdated software can significantly impact the docking behavior of your Roomba. Software updates often contain bug fixes, performance enhancements, and new features that can improve the overall functionality of your Roomba, including its ability to dock accurately and efficiently.
By keeping your Roomba’s software up to date, you ensure that it benefits from the latest advancements and optimizations provided by the manufacturer.
Furthermore, software updates can address known issues or compatibility problems that may be causing docking difficulties. It’s important to stay proactive and regularly check for updates to ensure your Roomba is running on the latest software version.
7.2 Connecting Roomba to Wi-Fi
Before updating the Roomba’s software, it’s essential to establish a Wi-Fi connection. Follow these steps to connect your Roomba to your home Wi-Fi network:
Step 1: Power on your Roomba
Ensure that your Roomba is turned on and in a ready state.
Step 2: Download the companion app
Download the official companion app for your Roomba model from the app store on your smartphone or tablet.
Step 3: Launch the app and create an account
Open the companion app and create a new account or log in with your existing credentials.
Step 4: Add your Roomba to the app
Follow the app’s instructions to add your Roomba to the app. This usually involves connecting to the Roomba’s Wi-Fi network during the setup process.
Step 5: Connect to your home Wi-Fi network
Once your Roomba is added to the app, navigate to the Wi-Fi settings section within the app. Follow the prompts to connect your Roomba to your home Wi-Fi network. Enter your network credentials when prompted.
7.3 Checking for Software Updates
To check for software updates, you can use either the companion app or visit the manufacturer’s website.
Here’s how you can check for software updates:
Using the Companion App:
- Launch the companion app on your smartphone or tablet.
- Ensure your Roomba is connected to the app and your home Wi-Fi network.
- Navigate to the software update section within the app. It may be labeled as “Software Update,” “Firmware Update,” or similar.
- The app will check for available updates. If any updates are found, follow the app’s instructions to proceed with the update process.
Via the Manufacturer’s Website:
- Open your web browser and visit the manufacturer’s website.
- Look for the support or downloads section of the website.
- Enter your Roomba model number or select your model from the provided options.
- Locate the software update section or download area.
- Download the latest software update file compatible with your Roomba model.
7.4 Updating Roomba’s Software
Follow these steps to initiate and complete the software update process for your Roomba:
Step 1: Prepare your Roomba
Ensure that your Roomba is charged and powered on. Place it near the docking station or ensure it is docked during the update process.
Step 2: Initiate the software update
Depending on whether you are using the companion app or the downloaded software update file, follow the respective instructions to initiate the update process. This may involve selecting the update file in the app or transferring the update file to your Roomba’s storage.
Step 3: Start the update process
Once the update process is initiated, follow the on-screen instructions provided by the app or the manufacturer’s website. This may include confirming the update, agreeing to terms and conditions, or granting permissions for the update to proceed.
Step 4: Wait for the update to complete
Allow the software update process to run its course. This can take some time, so be patient and avoid interrupting the update. It’s recommended to keep your Roomba connected to a stable Wi-Fi network and ensure it remains powered throughout the update process.
Step 5: Verify the update
After the update is complete, your Roomba will restart or indicate that the update has been successful. You may also receive a notification through the companion app if you are using one. Verify that the software update was installed successfully by checking the software version in the app or the Roomba’s settings.
During the software update process, it’s important to keep a few precautions and recommendations in mind:
- Ensure a stable internet connection: Make sure your Roomba remains connected to a stable Wi-Fi network throughout the update process to avoid any interruptions.
- Avoid turning off or disconnecting the Roomba: It’s crucial to keep your Roomba powered on and connected to the charging dock or power source during the update. Interrupting the update may result in incomplete or failed installation.
- Follow manufacturer’s instructions: Always refer to the instructions provided by the manufacturer, whether through the app or on their website. These instructions are specific to your Roomba model and will ensure a smooth and successful update.
- Contact customer support if encountering issues: If you encounter any difficulties during the update process or if the update fails, it’s advisable to contact the Roomba’s customer support for further assistance. They can provide guidance and help resolve any software-related issues.
In conclusion, updating your Roomba’s software is essential for maintaining optimal performance, including addressing docking issues.
Section 8: Contacting Roomba Support
Sometimes, despite your best efforts, you may still encounter persistent docking issues with your Roomba.
In such cases, it becomes necessary to reach out to Roomba’s customer support for professional assistance.
In this section, we’ll discuss the signs that indicate the need to contact support, the importance of gathering relevant information, how to reach Roomba support, effectively explaining the issue to the support team, and the subsequent follow-up and resolution process.
8.1 When to Contact Support
While troubleshooting steps can often resolve common issues, certain signs indicate the need for professional assistance. Consider reaching out to Roomba support if you experience the following:
- Docking issues persist despite implementing all the troubleshooting steps.
- The Roomba fails to respond to commands or exhibits abnormal behavior.
- You encounter error messages or codes that you are unable to resolve.
- There is physical damage to the Roomba or the docking station.
- You have exhausted all possible solutions and require expert guidance.
It’s important to exhaust all troubleshooting steps outlined in the previous sections before contacting support. This ensures that you have attempted all possible solutions and provides the support team with a comprehensive understanding of the issue.
8.2 Gathering Information
Before contacting Roomba support, gather relevant information to facilitate an effective support interaction. This includes:
- Roomba model and serial number: Locate and note down the model and serial number of your Roomba. This information helps the support team identify your specific device and its specifications.
- Error messages and observations: Take note of any error messages displayed by the Roomba. Additionally, observe and document any specific patterns or behaviors related to the docking issue. The more detailed information you provide, the easier it will be for the support team to diagnose and address the problem.
It’s essential to provide accurate and precise information to enable the support team to assist you effectively.
8.3 Reaching Roomba Support
To contact Roomba support, follow these steps:
- Visit the manufacturer’s official website.
- Look for the support section or contact information.
- Choose the appropriate support channel based on your preference and availability, such as phone, email, or online form.
Roomba’s official website typically provides clear instructions on how to get in touch with their customer support team. Select the support channel that aligns with your preferred method of communication.
8.4 Explaining the Issue
When communicating the docking issue to the support team, it’s crucial to explain the problem concisely and accurately. Follow these guidelines for effective communication:
- Provide a clear and detailed description of the problem, including when it started and any troubleshooting steps you have already attempted.
- Include relevant information such as the model and serial number of your Roomba, error messages or codes displayed, and any specific observations related to the docking issue.
- If possible, share supporting media such as videos or photos showcasing the problem. Visual aids can aid the support team in understanding and diagnosing the issue more effectively.
The more precise and comprehensive your explanation, the better equipped the support team will be to assist you.
8.5 Follow-Up and Resolution
After contacting Roomba support, it’s important to follow up on your inquiry. Here’s how you can navigate the follow-up and resolution process:
- Keep track of your support ticket or reference number provided by the support team. This will help you refer to your case easily during subsequent communications.
- If you haven’t received a response within the expected timeframe, politely reach out for an update. Be patient, as the support team may require some time to analyze and troubleshoot the issue.
- Collaborate with the support team, responding promptly to any requests for additional information or troubleshooting steps. Follow their instructions closely and provide feedback on the effectiveness of their recommendations.
- Communicate openly and honestly with the support team, sharing your observations and any progress or lack thereof. This will help them reassess the situation and provide further assistance.
- Be prepared to follow any troubleshooting steps or suggestions provided by the support team. They have expertise in addressing such issues and may recommend specific actions to resolve the docking problem.
- Maintain clear and respectful communication throughout the process. If the initial troubleshooting attempts do not lead to a resolution, discuss possible options with the support team, such as repair or replacement, based on the warranty or service agreements.
- Once the issue has been resolved, express your gratitude for the support team’s assistance. Share your feedback on the support experience, highlighting any exceptional service or improvements that could be made.
Remember that customer support is there to help you and find a solution to your docking issues. By maintaining open communication and actively collaborating with the support team, you increase the chances of resolving the problem effectively.
In conclusion, when all troubleshooting attempts fail, it’s important to contact Roomba support for professional assistance.
Gather relevant information about your Roomba model, error messages, and observations before reaching out to support.
Locate the manufacturer’s customer support page or contact information and choose the appropriate support channel.
Clearly and accurately explain the docking issue, providing any additional media or details that may aid in troubleshooting.
Follow up on your inquiry, collaborate with the support team, and be open to their suggestions and recommendations.
Maintain respectful communication throughout the process, and express your gratitude once the issue has been resolved.
By contacting Roomba support and working together, you can effectively address and resolve the docking issues with your Roomba.
In conclusion, dealing with a Roomba that refuses to go home and dock to charge can be frustrating, but with the help of this comprehensive troubleshooting guide, you are equipped with the knowledge and step-by-step instructions to address the issue. By checking the docking station, clearing the docking area, cleaning the charging contacts, resetting the Roomba, checking the battery, rebooting the docking station, updating the software, and reaching out to Roomba support if needed, you have a thorough plan to get your Roomba back on track.
Remember to be patient and systematic as you go through the troubleshooting steps. Each section provides detailed instructions and insights to help you resolve the issue effectively. With persistence and the support of Roomba’s troubleshooting resources, you can ensure that your Roomba happily returns home and docks to charge, ready to continue its efficient cleaning tasks.
Happy cleaning and enjoy the convenience of your Roomba!