If you’re like me, constantly juggling between different financial apps, you might have found yourself in a situation where you need to transfer money from Chime to Venmo in a hurry.
Fortunately, I’ve got some good news for you – it’s easier than you might think. In this guide, I’ll walk you through the process based on my own real-life experience.
Transferring money between Chime and Venmo can be done seamlessly with just a few simple steps. Whether you need to split a bill with friends or send money to a family member, this guide will show you how to do it quickly and efficiently.
By following the steps outlined in this article, you’ll be able to transfer money from your Chime account to your Venmo account in no time.
We’ll cover everything from opening the Chime app to confirming the transaction on Venmo. With this guide, you’ll have the confidence to make instant transfers whenever you need to.
So, let’s get started and learn how to transfer money from Chime to Venmo effortlessly.

Table of Contents
Step 1: Open Chime App
To begin the process of transferring money from Chime to Venmo, the first step is to open the Chime app on your phone.

If you haven’t already installed the app, you can easily find it on your app store and download it for free. Once you have the app installed, unlock your phone and locate the Chime app icon. Tap on it to open the app.
Once you’re in the Chime app, you will need to log in with your credentials. Enter your username and password to access your Chime account. If you haven’t created an account yet, you will need to sign up for one before proceeding with the transfer.
Logging in to the Chime app will give you access to all the features and options available, including the ability to transfer money. Make sure you have a stable internet connection to ensure a smooth experience throughout the process.
By following this first step and opening the Chime app, you’re one step closer to transferring money from Chime to Venmo. The next section will guide you through the process of locating the ‘Move Money’ option within the Chime app.
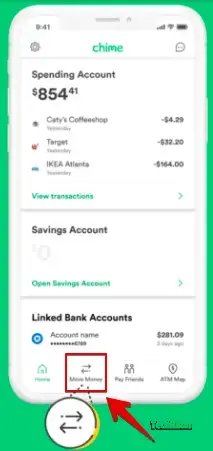
Step 2: Locate the ‘Move Money’ Option
To locate the ‘Move Money’ option in the Chime app, you will need to navigate to the designated section. This section is typically represented by an icon resembling an arrow pointing from one place to another. Look for this icon and tap on it to access the various options available for moving your money.
Once you have tapped on the ‘Move Money’ icon, you will be directed to a new screen where you can explore different ways to transfer your funds. The ‘Move Money’ section provides you with a range of options to suit your specific needs.
Within the ‘Move Money’ section, you may find features such as ‘Send Money’, ‘Pay a Friend’, or other similar options. These features allow you to initiate transfers to external accounts, including your Venmo account.
By selecting the appropriate option within the ‘Move Money’ section, you will be able to proceed with transferring your funds from Chime to Venmo. This step is crucial in ensuring a seamless and secure transfer process.
In the next section, we will guide you through the process of choosing the ‘Send Money’ option within the ‘Move Money’ section of the Chime app. This will enable you to proceed with the transfer and seamlessly move your money to your Venmo account.
Step 3: Choose ‘Send Money’
To proceed with transferring your funds from Chime to Venmo, you will need to choose the ‘Send Money’ option within the ‘Move Money’ section of the Chime app. Among the various options available, look for ‘Send Money’ or ‘Pay a Friend’. The wording might differ slightly depending on the version of the Chime app you are using. This feature allows you to initiate the transfer of money to your Venmo account.
By selecting the ‘Send Money’ option, you will be able to enter the necessary details to complete the transfer. This includes specifying the recipient, which in this case will be your Venmo account. You will need to provide the recipient’s information, such as their name and Venmo username, to ensure the funds are sent to the correct account.
Once you have entered the recipient’s information, you can proceed to the next step of the transfer process. This will involve specifying the amount you wish to send to your Venmo account. Make sure to double-check the amount before confirming the transaction to avoid any errors.
Choosing the ‘Send Money’ option within the ‘Move Money’ section of the Chime app is a crucial step in the process of transferring money from Chime to Venmo. It allows you to initiate the transfer and ensures a seamless and secure transaction. Now that you have selected the ‘Send Money’ option, you are ready to proceed to the next step of the transfer process, which involves opening the Venmo app.
Step 4: Add Venmo Recipient
To successfully transfer money from Chime to Venmo, the next step is to add your Venmo account as a recipient. Within the Chime app, look for the ‘Add Recipient’ or a similar option. Click on it to proceed. This step is crucial as it ensures that the funds are sent to the correct Venmo account.
When prompted, input the necessary information, including the recipient’s name and Venmo username. Double-check the details to ensure accuracy. Providing the correct recipient information is essential to ensure that the transfer is successful and that the funds reach the intended Venmo account.
By adding your Venmo account as a recipient, you establish a connection between your Chime and Venmo accounts, enabling the seamless transfer of funds. This step is straightforward and should only take a few moments to complete.
Once you have added your Venmo account as a recipient, you are ready to proceed to the next step of the transfer process. In the following section, we will guide you through entering the amount you wish to transfer and confirming the transaction.
Step 5: Enter Amount and Confirm
After adding the recipient, it’s time to specify the amount you want to transfer from your Chime account to Venmo. This step is crucial as it determines the exact amount that will be deducted from your Chime balance and transferred to your Venmo account.
To enter the amount, locate the designated field within the Chime app. It may be labeled as ‘Amount’ or ‘Transfer Amount.’ Once you find it, input the desired amount using the on-screen keypad. Take a moment to double-check the entered amount to ensure accuracy.
It’s important to note that some Chime accounts may have transfer limits or fees associated with transferring funds. If you encounter any limitations or fees, make sure to review them before proceeding with the transfer.
Once you have entered the amount, review all the details on the screen to ensure everything is accurate. Confirm that the recipient’s information, the transfer amount, and any associated fees are correct.
When you are satisfied with the entered information, proceed by tapping the ‘Confirm’ or ‘Send’ button. This action will initiate the transfer process, deducting the specified amount from your Chime account and preparing it for transfer to your Venmo account.
In the next section, we will guide you through the process of opening the Venmo app and completing the final steps to receive the transferred funds.
Step 6: Open Venmo
Now, it’s time to switch over to the Venmo app and complete the final steps to receive the transferred funds. If you haven’t already done so, you will need to download the Venmo app from your app store. Simply search for “Venmo” and select the official app from the search results. Once you have downloaded and installed the app, open it on your device.
Next, you will need to log in to your Venmo account. If you already have an account, enter your login credentials, which typically include your email address or phone number and your password. If you don’t have an account yet, you will need to sign up for one. Follow the prompts on the screen to create a new account using your preferred email address or phone number.
Once you have successfully logged in to your Venmo account, you will be able to access all the features and functionalities of the app. This includes viewing your Venmo balance, sending and receiving money, and managing your transactions.
In the next section, we will guide you through the process of locating the ‘Transfer Money’ or ‘Add Money’ option within the Venmo app, which is the final step to complete the transfer from your Chime account to Venmo.
Step 7: Locate ‘Transfer Money’ Option
To complete the transfer from your Chime account to Venmo, you will need to locate the ‘Transfer Money’ or ‘Add Money’ option within the Venmo app. This option is essential for initiating the transaction and receiving the funds.
Once you have opened the Venmo app on your device, take a moment to familiarize yourself with the interface. Look for a symbol resembling a cash icon, which typically represents the ‘Transfer Money’ or ‘Add Money’ option. It may be located in the main menu or on the home screen of the app.
When you have located the option, tap on it to proceed. This will take you to a new screen where you can enter the necessary details for the transfer.
It’s important to ensure that you have entered the correct recipient information and the exact amount you wish to transfer. Double-check these details before proceeding to the next step.
In the following section, we will guide you through the process of confirming the transaction within the Venmo app. This final step will ensure that the transfer is successfully completed and the funds are securely transferred from your Chime account to Venmo.
Step 8: Confirm Transaction
After entering the necessary details for the transfer in the Venmo app, you will be prompted to confirm the transaction. This step is crucial to ensure that the transfer is accurate and that the funds are securely transferred from your Chime account to Venmo.
Take a moment to review the transaction details displayed on the screen. Verify that the recipient information and the amount you entered in the Chime app match the information shown in Venmo. It’s important to double-check these details to avoid any errors or discrepancies.
Once you have confirmed that the details are correct, simply tap on the ‘Confirm’ button. This action will initiate the transfer process and finalize the transaction.
By confirming the transaction, you are giving your consent for the funds to be transferred from your Chime account to Venmo. It’s important to note that once the transfer is confirmed, it cannot be reversed. Therefore, it’s crucial to ensure the accuracy of the details before proceeding.
In the next section, we will discuss the final step of the process, which involves waiting for confirmation of the transaction. This step will provide reassurance that the transfer has been successfully completed and that the funds are now available in your Venmo account.
Step 9: Wait for Confirmation

In most cases, the money transfer is instant. However, it’s a good idea to give it a moment and check both your Chime and Venmo accounts to ensure the transaction is complete.
After confirming the transaction in the Venmo app, it may take a few moments for the funds to be fully transferred from your Chime account to Venmo. During this time, it’s important to be patient and avoid making any additional transactions or changes that could potentially disrupt the transfer process.
To check the status of the transfer, you can simply navigate to your Chime and Venmo account dashboards. In your Chime app, you can view your transaction history to see if the transfer has been processed successfully. Similarly, in your Venmo app, you can check your transaction history to confirm that the funds have been received.
If you notice any delays or issues with the transfer, it’s recommended to reach out to the customer support teams of both Chime and Venmo for assistance. They will be able to provide you with further guidance and help resolve any potential issues.
Conclusion
Once you have confirmed that the transfer is complete and the funds are available in your Venmo account, you can proceed to use the transferred money for various transactions, such as making payments to friends or merchants.

Overall, transferring money from Chime to Venmo is a seamless process that allows you to easily access and use your funds. So, go ahead and give it a try! Happy transferring!