Adobe After Effects is a popular tool used for creating visual effects, motion graphics, and video editing. However, many users experience frustration when attempting to render and export their footage, only to have the process fail partway through, resulting in lost progress. In this article, I’ll be discussing the solution to fix the render fail issues in Adobe After Effects and share some tips that’ll help you make your renders as smooth and error free as possible.
As a video editor who has experienced the frustration of a failed render in Adobe After Effects, it’s hard to describe the disappointment and despair that comes with it. Spending countless hours creating and perfecting a project, only to have it fail halfway through the render process, can be devastating.
I remember working on a particularly complex project that required a lot of time and effort. After working on it for several days straight, I finally got to the point where I was ready to render the final product. I hit the render button and waited patiently, only to be met with an error message about 26 hours into the 56-hour render. Not only did I lose all that time and effort, but the output file was also corrupted, making it impossible to salvage any progress.
If you’ve ever experienced the frustration of a failed render in After Effects, you know just how disheartening it can be. But don’t give up hope just yet!
I’ll be sharing some tried-and-true tips and solutions to help prevent render failures and ensure that your projects are exported smoothly and without error. Whether you’re a seasoned pro or just starting out, these tips are sure to save you time, effort, and a whole lot of headaches. So let’s dive in and get your renders back on track!
Table of Contents
Steps To Resolve And Prevent Render Fails In Adobe After Effects
Now, let’s discuss the steps you need to take to resolve and prevent render failures in Adobe After Effects.
Step 1: Identify The Issue
The first step is to identify whether or not the render failure has something to do with the source file itself.
Although the issue is often related to the software itself, there may be cases where After Effects is unable to encode a project into a particular format from the source format, especially when effects have been applied.
To confirm this, you can check the log file by pressing CTRL + L inside After Effects.
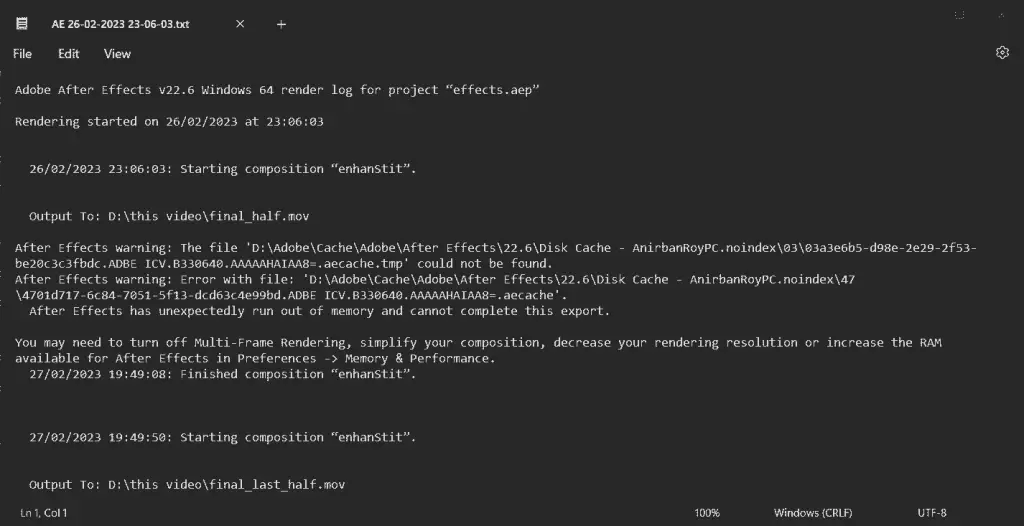
When you open the log file in Adobe After Effects, you will see a list of events that took place during the rendering process. Look for any error messages or warnings that may indicate the cause of the render failure.
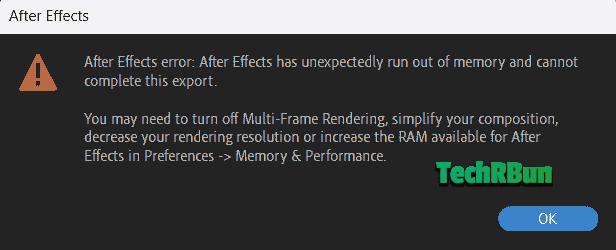
Some common errors include “error creating movie file,” and “file format not supported.” If you see any of these errors, it may indicate that the source file format is incompatible with After Effects or that there is an issue with the settings used in the project.
If you see any error codes in the log file that are not related to file format or project settings, it may indicate a problem with the Adobe After Effects software itself. However, don’t worry, as the solution presented in this article will help you deal with any type of error and ensure a smooth render.
Whether it’s a file format issue or a software-related problem, the steps outlined in this article will help you identify the issue and take corrective action. By following these guidelines, you can avoid frustrating rendering failures and ensure that your projects are completed smoothly and error-free.
Step 2: Purge All Memory And Disk Cache
When working on complex projects in Adobe After Effects, the software can generate a significant amount of cache data that is stored on your computer’s hard drive. This data includes previews, temporary files, and other media that After Effects uses to render your project quickly.
However, if you start a new render without clearing the cache data, it can cause problems and errors during the rendering process. For example, the cache data from a previous project may be incompatible with your current project, causing the rendering process to fail.
To prevent this issue, it’s important to purge all media and disk cache before starting a new render in Adobe After Effects. This clears out all the cache data from previous projects and ensures that After Effects has the necessary resources to render your current project smoothly and efficiently.
To purge the cache data, go to the Edit menu and select “Purge” > “All Memory & Disk Cache”, as shown in the image below.
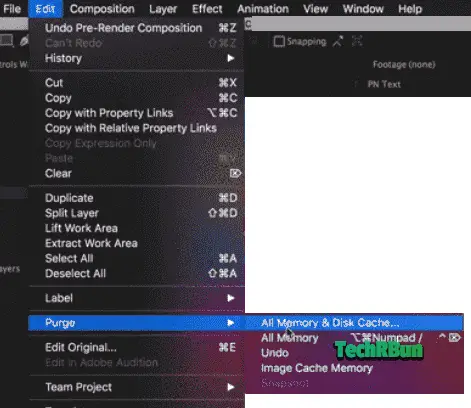
This will clear all cache data from After Effects and ensure that your rendering process is not hindered by any old cache data.
Step 3: Export Video As PNG Sequence
When you’re rendering your project in Adobe After Effects, the best output format to use is a PNG sequence. This format saves each frame of your project as a separate image file, and it’s considered the safest and most reliable option for several reasons.
One of the biggest advantages of using a PNG sequence is that if your render fails or you need to shut down your computer, you can resume the render from where it left off. Because each frame is saved as a separate file, you won’t lose any progress if something goes wrong during the rendering process.,
Another great thing about using a PNG sequence is that it makes compiling your video later on super easy. Once you have all of the individual frames saved as PNG files, you can quickly and easily compile them into any video format you want. This gives you more control and flexibility over your final output.
Finally, using a PNG sequence ensures that your project is saved in a lossless format, which means that you won’t lose any quality or detail during the rendering process. This ensures that your final output is of the highest possible quality.
Here are the steps to render a video as a PNG sequence in Adobe After Effects:
- Once you have completed your video edit in After Effects, navigate to the “Composition” tab at the top of the screen.
- From the dropdown menu, select “Add to Render Queue.” This will open up the Render Queue panel.
- In the Render Queue panel, under “Output Module,” click on the “Lossless” option to bring up the Output Module Settings.
- In the Output Module Settings, select “PNG Sequence” as your format.
- Choose your desired location to save the rendered PNG sequence in the “Output To” section.
- Specify the range of frames you want to export in the “Range” section. You can choose to export the entire composition or a specific range of frames.
- If desired, adjust any additional settings such as frame rate or color depth.
- Click “Render” to begin exporting your video as a PNG sequence.
After Effects will then start rendering the PNG sequence, saving each frame as a separate PNG file. Once the rendering is complete, you’ll have a folder full of PNG files that can be combined into a video file.
It’s worth noting that sometimes, rendering an image sequence can fail or encounter errors. However, even if this happens, there’s no need to panic. The already generated PNG files will remain safe and sound on your computer, so you can simply restart the rendering process from the last successfully exported frame.
This means that there’s really no risk of losing any of your hard work or progress, even if there are technical hiccups along the way. So, if you do happen to encounter any issues while rendering your PNG sequence, just take a deep breath and try again from the last successful frame – you’ll be back on track in no time.
Overall, rendering your project as a PNG sequence is the best way to ensure that you have a backup of all of your frames, and that your final output is of the best possible quality.
Step 4: Convert Image Sequence To Video File
Alright, so now it’s time to turn that PNG sequence into a video file. Lucky for us, there are a couple of different software options that can get the job done – Adobe After Effects and Premiere Pro. So, take your pick!
If you’re going the After Effects route, proceed with the following steps:
- Open After Effects and create a new composition by selecting “Composition” from the top menu and then “New Composition.”
- In the new composition dialog box, set the width, height, frame rate, and duration for your video. Make sure these settings match the specifications of your PNG sequence.
- Import your PNG sequence into the project by selecting “File” from the top menu and then choosing “Import.”
- In the import dialog box, navigate to the location of your PNG sequence and select all of the individual PNG files. Make sure to check the “Image Sequence” box at the bottom of the dialog box.
- After importing your PNG sequence, drag and drop it into the timeline panel.
- Once your PNG sequence is in the timeline, select “File” from the top menu and then choose “Export” followed by “Add to Adobe Media Encoder Queue.”
- In the Adobe Media Encoder, select the format and settings for your video output. Common video formats include H.264, MPEG-4, and QuickTime.
- After selecting your format and settings, click the “Encode” button to convert your PNG sequence to a video file.
On the other hand, if Premiere Pro is more your jam, follow these steps:
- Open Premiere Pro and create a new project by selecting “File” from the top menu and then choosing “New Project.”
- In the new project dialog box, set the name, location, and other project settings as desired.
- Import your PNG sequence into the project by selecting “File” from the top menu and then choosing “Import.”
- In the import dialog box, navigate to the location of your PNG sequence and select all of the individual PNG files. Make sure to check the “Image Sequence” box at the bottom of the dialog box.
- After importing your PNG sequence, drag and drop it into the timeline panel.
- Once your PNG sequence is in the timeline, select “File” from the top menu and then choose “Export” followed by “Media.”
- In the export dialog box, select the format and settings for your video output. Common video formats include H.264, MPEG-4, and QuickTime.
- After selecting your format and settings, hit “Export”.
Voila! You now have a lovely video file ready to go.
Overall, converting a PNG sequence to a video is a piece of cake, with either of the two software.
Conclusion
I hope this article has helped you resolve and prevent render failures in Adobe After Effects. By following the tips shared here, you can save time and avoid the frustration of lost progress due to failed renders.
Remember to always check your log files, purge your cache, and use a PNG sequence as your output format.
If you have any queries or would like to share your own tips, feel free to leave a comment below. Happy editing and have a great day!