
 Anirban Roy
 After a decade of running WooCommerce stores, I’ve learned that a clear and trustworthy checkout process is non-negotiable. A huge part of that is the payment options you present. Nothing looks more unprofessional than a gateway with a confusing name like “BACS” or a generic “Credit Card (Stripe)” title that you can’t change.
Some payment gateway plugins let you edit their text, but many don’t. That’s where I rely on a simple, powerful tool that has become essential to my workflow: the Rename Payment Methods for WooCommerce plugin.
It creates a single, central dashboard to control the title and description for every payment gateway on your site, giving you full control. This ensures a consistent and professional experience for your customers, which can make a real difference to your bottom line.
How to Get Started
The process is incredibly straightforward. Here’s a detailed walkthrough.
Step 1: Install the Plugin
First, you’ll need to get the plugin and install it on your site. It requires WooCommerce to be active to function.
Purchase and download the plugin here: Rename Payment Methods on WooCommerce.com
Once downloaded, navigate to your WordPress dashboard:
- Go to Plugins > Add New.
- Click the Upload Plugin button at the top.
- Choose the
.zipfile you downloaded and click Install Now. - After installation, click Activate Plugin.
Step 2: Locate the Settings Panel
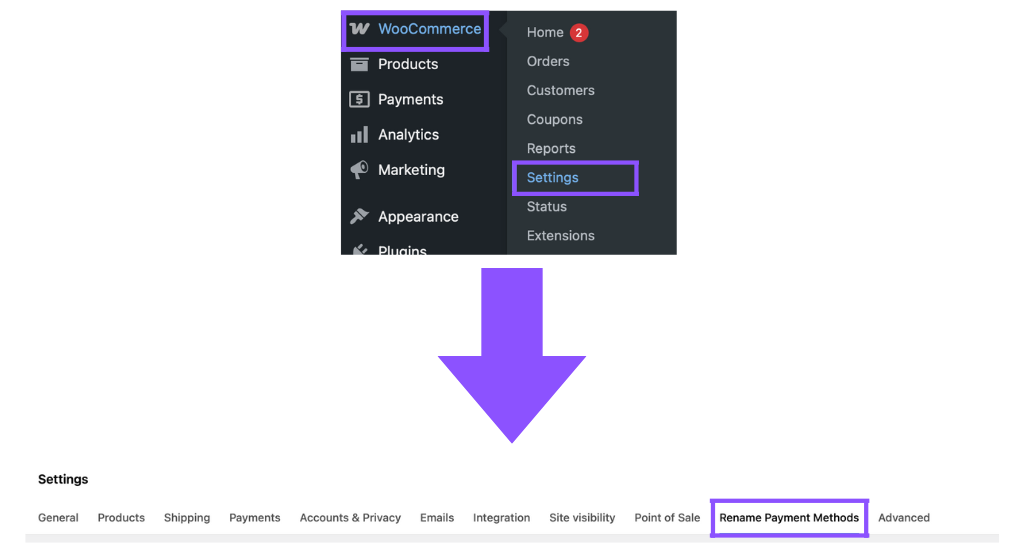
With the plugin active, you can find its settings in two convenient places:
- Primary Location: Navigate to WooCommerce > Settings and click on the new “Rename Payment Methods”tab that appears at the end of the list.
- Shortcut: On your main Plugins page, you’ll now see a “Settings” link directly under the plugin’s name. Clicking this will take you straight to the correct tab.
Step 3: Customize Your Payment Methods
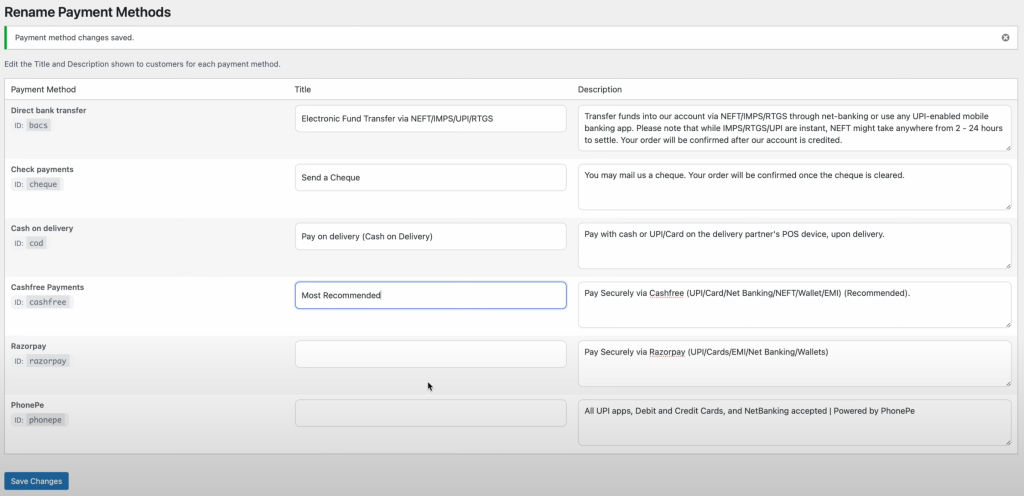
Inside the settings tab, you’ll find a clean table listing every payment gateway installed on your site—even disabled ones. For each gateway, you’ll see its official name, its system ID (like cod or stripe), and two fields: Title and Description.
Here’s how to make your changes:
- Find the Gateway: Locate the payment method you want to change in the list.
- Enter a New Title: In its “Title” field, type the new text you want customers to see at checkout. For example, you could change “Direct bank transfer” to “Pay via Bank Transfer (2-3 Day Clearing)”.
- Add a New Description: In the “Description” field, add helpful instructions or details. This text appears when a customer selects the payment option.
- Save Your Work: Once you’ve made your changes, scroll to the bottom and click the “Save changes” button.
Your custom text will now appear on your checkout page. The best part is that it works seamlessly with both the classic WooCommerce checkout and the modern block-based checkout.
This plugin is one of those simple tools that solves a common problem elegantly. It gives you the control you need to create a clearer, more professional checkout experience for your customers.
For more detailed information, you can always check the Official Plugin Documentation.
If you have any questions, feel free to drop a comment below. I’m happy to help!
